
Change History
Message: [講義] Illustrator 角色繪製
Changed By: JinJin
Change Date: March 27, 2013 08:35AM
[講義] Illustrator 角色繪製
Change Date: March 27, 2013 08:35AM
[講義] Illustrator 角色繪製
<h2>Illustrator角色建立示範</h2>
<h3>設計簡潔的向量熊貓角色</h3>
http://blog.spoongraphics.co.uk/tutorials/create-a-cool-vector-panda-character-in-illustrator
原創來自克里斯斯普納的的教程。
利用幾個簡單的圖形、善用顏色漸層級漸變工具、以及善用陰影,不用出現外框,就可以創造出簡潔生動的角色。
這個練習雖然看似簡單,但每位同學都要練習,學習以漸層與陰影取代外框,製作高質感的簡易插畫。
[img]http://www.blog.spoongraphics.co.uk/wp-content/uploads/2010/panda/01.jpg[/img]
[img]http://www.blog.spoongraphics.co.uk/wp-content/uploads/2010/panda/vector-panda-character.jpg[/img]
[hr]
1.使用橢圓工具,搭配Shift鍵,畫出一正圓
[IMG]http://i556.photobucket.com/albums/ss1/whc915/panda001.jpg[/IMG]
[hr]
2.使用直接選取工具,點選最上端的空心點,向下垂直拖曳
[IMG]http://i556.photobucket.com/albums/ss1/whc915/panda002.jpg[/IMG]
[hr]
3.再繪製另一個較小的圓,以類似的做法完成鼻子的輪廓
[IMG]http://i556.photobucket.com/albums/ss1/whc915/panda003.jpg[/IMG]
[IMG]http://i556.photobucket.com/albums/ss1/whc915/panda004.jpg[/IMG]
[hr]
4.接著同樣以橢圓工具搭配Shift鍵畫出一正圓,右側靠在鼻子的中心點上
[IMG]http://i556.photobucket.com/albums/ss1/whc915/panda005.jpg[/IMG]
將鼻子按右鍵→排列順序→置在最前
再將剛剛正圓按Alt鍵,對稱複製於右側
[IMG]http://i556.photobucket.com/albums/ss1/whc915/panda006.jpg[/IMG]
[hr]
5.接著同樣以橢圓工具搭配Shift鍵畫出一正圓,繪製大大的眼睛
[IMG]http://i556.photobucket.com/albums/ss1/whc915/panda007.jpg[/IMG]
[hr]
6.選取大圓眼,物件→變形→縮放→70%→拷貝
[IMG]http://i556.photobucket.com/albums/ss1/whc915/panda008.jpg[/IMG]
[hr]
7.再複製65%,將此圓,移動,接著繪製更小的圓,製作眼球中的亮點
[IMG]http://i556.photobucket.com/albums/ss1/whc915/panda009.jpg[/IMG]
[hr]
8.選取整組眼睛,Shift+Alt→水平移動複製到右邊
[IMG]http://i556.photobucket.com/albums/ss1/whc915/panda011.jpg[/IMG]
[hr]
9.接著製作耳朵,一樣用橢圓工具製作
[IMG]http://i556.photobucket.com/albums/ss1/whc915/panda012.jpg[/IMG]
[IMG]http://i556.photobucket.com/albums/ss1/whc915/panda013.jpg[/IMG]
[IMG]http://i556.photobucket.com/albums/ss1/whc915/panda014.jpg[/IMG]
[hr]
10.接著製作身體
[IMG]http://i556.photobucket.com/albums/ss1/whc915/panda015.jpg[/IMG]
[IMG]http://i556.photobucket.com/albums/ss1/whc915/panda016.jpg[/IMG]
[IMG]http://i556.photobucket.com/albums/ss1/whc915/panda017.jpg[/IMG]
[IMG]http://i556.photobucket.com/albums/ss1/whc915/panda018.jpg[/IMG]
[IMG]http://i556.photobucket.com/albums/ss1/whc915/panda019.jpg[/IMG]
[IMG]http://i556.photobucket.com/albums/ss1/whc915/panda020.jpg[/IMG]
[IMG]http://i556.photobucket.com/albums/ss1/whc915/panda021.jpg[/IMG]
[IMG]http://i556.photobucket.com/albums/ss1/whc915/panda022.jpg[/IMG]
[hr]
11.黑框線稿完成
[IMG]http://i556.photobucket.com/albums/ss1/whc915/panda023.jpg[/IMG]
[hr]
上色時,善用漸層工具,將可輕鬆取代外框線稿,並產生豐富生動的效果
[IMG]http://i556.photobucket.com/albums/ss1/whc915/panda024.jpg[/IMG]
[IMG]http://i556.photobucket.com/albums/ss1/whc915/panda026.jpg[/IMG]
[IMG]http://i556.photobucket.com/albums/ss1/whc915/panda027.jpg[/IMG]
[hr]
製作眼睛外框的陰影,效果→風格化→製作陰影
[IMG]http://i556.photobucket.com/albums/ss1/whc915/panda029.jpg[/IMG]
[hr]
頭部及手部的陰影,則可多繪製一個區塊,選擇→效果→模糊→高斯模糊
[IMG]http://i556.photobucket.com/albums/ss1/whc915/panda030.jpg[/IMG]
再加上透明度約15%左右,可適當調整至適中
[IMG]http://i556.photobucket.com/albums/ss1/whc915/panda031.jpg[/IMG]
[hr]
完成稿
[IMG]http://i556.photobucket.com/albums/ss1/whc915/panda032.jpg[/IMG]
[hr]
[color=#993300]※補充說明:[/color]
<b>[color=#009999]「漸層」工具[/color]</b>
「漸層」工具可提供與「漸層」面板大致相同的功能。可以使用漸層註解者修改線性漸層的角度、位置和擴散,或修改放射性漸層的焦點、原點和擴散。按兩下個別漸層色標可以指定新的色彩設定和不透明度設定,或將漸層色標拖移到新的位置。
將指標放在漸層上方並出現旋轉游標時,可以拖移來重新放置漸層角度。拖移漸層滑桿的圓形端點可重新放置漸層原點,而拖移箭頭端點可增加或減少漸層範圍。
[img]http://help.adobe.com/zh_TW/illustrator/cs/using/images/pt_48.png[/img]
[hr]
[url=http://mepopedia.com/forum/file.php?991,file=1038,filename=panda--_.ai]Panda線搞[/url]
[hr]
<h3>Illustrator向量優雅貓頭鷹圖案</h3>
http://blog.spoongraphics.co.uk/tutorials/create-an-elegant-patterned-vector-owl-in-illustrator
<img width=50% src=http://i556.photobucket.com/albums/ss1/whc915/ma068.jpg />
[hr]
1.繪製身體基本型
<img width=50% src=http://i556.photobucket.com/albums/ss1/whc915/ma001.jpg />
<img width=40% src=http://i556.photobucket.com/albums/ss1/whc915/ma002.jpg /> <img width=30% src=http://i556.photobucket.com/albums/ss1/whc915/ma003.jpg />
<img width=50% src=http://i556.photobucket.com/albums/ss1/whc915/ma004.jpg />
<img width=50% src=http://i556.photobucket.com/albums/ss1/whc915/ma005.jpg />
<img width=50% src=http://i556.photobucket.com/albums/ss1/whc915/ma006.jpg />
<img width=50% src=http://i556.photobucket.com/albums/ss1/whc915/ma007.jpg />
<img width=50% src=http://i556.photobucket.com/albums/ss1/whc915/ma008.jpg />
<img width=50% src=http://i556.photobucket.com/albums/ss1/whc915/ma009.jpg />
<img width=50% src=http://i556.photobucket.com/albums/ss1/whc915/ma010.jpg />
<img width=50% src=http://i556.photobucket.com/albums/ss1/whc915/ma011.jpg />
<img width=50% src=http://i556.photobucket.com/albums/ss1/whc915/ma012.jpg />
<img width=50% src=http://i556.photobucket.com/albums/ss1/whc915/ma013.jpg />
<img width=50% src=http://i556.photobucket.com/albums/ss1/whc915/ma014.jpg />
<img width=50% src=http://i556.photobucket.com/albums/ss1/whc915/ma015.jpg />
<img width=50% src=http://i556.photobucket.com/albums/ss1/whc915/ma016.jpg />
<img width=50% src=http://i556.photobucket.com/albums/ss1/whc915/ma017.jpg />
<img width=50% src=http://i556.photobucket.com/albums/ss1/whc915/ma018.jpg />
<img width=50% src=http://i556.photobucket.com/albums/ss1/whc915/ma019.jpg />
<img width=50% src=http://i556.photobucket.com/albums/ss1/whc915/ma020.jpg />
<img width=50% src=http://i556.photobucket.com/albums/ss1/whc915/ma021.jpg />
<img width=50% src=http://i556.photobucket.com/albums/ss1/whc915/ma022.jpg />
<img width=50% src=http://i556.photobucket.com/albums/ss1/whc915/ma023.jpg />
<img width=50% src=http://i556.photobucket.com/albums/ss1/whc915/ma024.jpg />
<img width=50% src=http://i556.photobucket.com/albums/ss1/whc915/ma025.jpg />
<img width=50% src=http://i556.photobucket.com/albums/ss1/whc915/ma026.jpg />
<img width=50% src=http://i556.photobucket.com/albums/ss1/whc915/ma027.jpg />
<img width=50% src=http://i556.photobucket.com/albums/ss1/whc915/ma028.jpg />
<img width=50% src=http://i556.photobucket.com/albums/ss1/whc915/ma029.jpg />
<img width=50% src=http://i556.photobucket.com/albums/ss1/whc915/ma030.jpg />
<img width=50% src=http://i556.photobucket.com/albums/ss1/whc915/ma031.jpg />
<img width=50% src=http://i556.photobucket.com/albums/ss1/whc915/ma032.jpg />
<img width=50% src=http://i556.photobucket.com/albums/ss1/whc915/ma033.jpg />
<img width=50% src=http://i556.photobucket.com/albums/ss1/whc915/ma034.jpg />
<img width=50% src=http://i556.photobucket.com/albums/ss1/whc915/ma035.jpg />
<img width=50% src=http://i556.photobucket.com/albums/ss1/whc915/ma036.jpg />
<img width=50% src=http://i556.photobucket.com/albums/ss1/whc915/ma037.jpg />
<img width=50% src=http://i556.photobucket.com/albums/ss1/whc915/ma038.jpg />
<img width=50% src=http://i556.photobucket.com/albums/ss1/whc915/ma039.jpg />
<img width=50% src=http://i556.photobucket.com/albums/ss1/whc915/ma040.jpg />
<img width=50% src=http://i556.photobucket.com/albums/ss1/whc915/ma041.jpg />
<img width=50% src=http://i556.photobucket.com/albums/ss1/whc915/ma042.jpg />
<img width=50% src=http://i556.photobucket.com/albums/ss1/whc915/ma043.jpg />
<img width=50% src=http://i556.photobucket.com/albums/ss1/whc915/ma044.jpg />
<img width=50% src=http://i556.photobucket.com/albums/ss1/whc915/ma045.jpg />
<img width=50% src=http://i556.photobucket.com/albums/ss1/whc915/ma046.jpg />
<img width=50% src=http://i556.photobucket.com/albums/ss1/whc915/ma047.jpg />
<img width=50% src=http://i556.photobucket.com/albums/ss1/whc915/ma048.jpg />
<img width=50% src=http://i556.photobucket.com/albums/ss1/whc915/ma049.jpg />
<img width=50% src=http://i556.photobucket.com/albums/ss1/whc915/ma050.jpg />
<img width=50% src=http://i556.photobucket.com/albums/ss1/whc915/ma051.jpg />
<img width=50% src=http://i556.photobucket.com/albums/ss1/whc915/ma052.jpg />
<img width=50% src=http://i556.photobucket.com/albums/ss1/whc915/ma053.jpg />
<img width=50% src=http://i556.photobucket.com/albums/ss1/whc915/ma054.jpg />
<img width=50% src=http://i556.photobucket.com/albums/ss1/whc915/ma055.jpg />
<img width=50% src=http://i556.photobucket.com/albums/ss1/whc915/ma056.jpg />
<img width=50% src=http://i556.photobucket.com/albums/ss1/whc915/ma057.jpg />
<img width=50% src=http://i556.photobucket.com/albums/ss1/whc915/ma058.jpg />
<img width=50% src=http://i556.photobucket.com/albums/ss1/whc915/ma059.jpg />
[hr]
置入photoshop
<img width=50% src=http://i556.photobucket.com/albums/ss1/whc915/ma064.jpg />
<img width=50% src=http://i556.photobucket.com/albums/ss1/whc915/ma065.jpg />
<img width=50% src=http://i556.photobucket.com/albums/ss1/whc915/ma066.jpg />
<img width=50% src=http://i556.photobucket.com/albums/ss1/whc915/ma067.jpg />
[hr]
完成品
<img width=50% src=http://i556.photobucket.com/albums/ss1/whc915/ma068.jpg />
[hr]
<h2>其他網路教程參考範例</h2>
網路上有許多專業且多樣風格的角色繪製技巧,同學們可以選擇自己喜歡的風格或繪製方式,試著按照教程自己做看看吧,相信可以從中學習許多寶貴的繪製技巧與創意發想。
[hr]
1.人物角色繪製│http://colorburned.com/2009/07/create-a-character-mascot-with-adobe-illustrator-cs4.html
[img]http://api.photoshop.com/v1.0/accounts/ce623456af6a4e469a7d88bc2b85162c/assets/17c9ccc3b3144b8bb6216be7bc5f7625[/img]
[hr]
2.可愛和簡單的河馬│http://vforvectors.com/create-a-cute-and-simple-hippo-face/
簡單的Illustrator教程橢圓工具,矩形工具,圓角矩形工具創建簡單的河馬。
[img]http://vforvectors.com/wp-content/uploads/2010/02/00.jpg[/img]
[hr]
3.Twitter鳥LOGO│ http://bloomwebdesign.net/myblog/2011/08/11/create-a-cute-twitter-bird-character-in-illustrator/
了解如何以Illustrator繪製可愛的卡通Twitter鳥。
[img]http://bloomwebdesign.net/myblog/files/2011/08/twitter-character-bird-icon-vector-illustrator-tweet.jpg[/img]
[hr]
4.向量士兵製作│ http://blog.spoongraphics.co.uk/tutorials/how-to-create-a-vector-soldier-character-in-illustrator
下面的教程教你如何以 Illustrator 創建可愛的向量士兵。
[img]http://www.blog.spoongraphics.co.uk/wp-content/uploads/2011/soldier-character/vector-soldier-character.jpg[/img]
[hr]
5.使用Illustrator創建一個條紋的貓│ http://www.cutelittlefactory.com/tutorials/create-a-tiger-striped-cat-with-illustrator/
[img]http://www.cutelittlefactory.com/wp-content/uploads/2010/07/final.jpg[/img]
[hr]
6.在Illustrator中創建的│ http://blog.spoongraphics.co.uk/tutorials/create-a-cool-vector-robot-character-in-illustrator
想學習Adobe Illustrator中的基本的向量機器人嗎?在本教程中,您將使用各種工具和技術來創建一個簡單的向量機器人。這個機器人使用大量的基本形狀,適合初學者掌握與Illustrator的應用程序。
[img]http://www.blog.spoongraphics.co.uk/wp-content/uploads/2011/robot/robot-character-sm.jpg[/img]
[hr]
7.頭巾娃娃│http://bloomwebdesign.net/myblog/2011/04/14/design-a-babushka-doll-in-illustrator/
如何在Illustrator中,建立東歐模式的頭巾娃娃。
[img]http://bloomwebdesign.net/myblog/files/2011/04/babushka-doll-design-vector.jpg[/img]
[hr]
8.可愛的小豬撲滿│http://www.noupe.com/tutorial/how-to-create-a-cute-piggy-bank-in-perspective-with-adobe-illustrator.html
創建一個可愛的粉紅色的小豬撲滿。
[img]http://media.noupe.com//uploads/2011/03/0352_500px.jpg[/img]
[hr]
9.創建一個可愛的向量馴鹿│ http://blog.spoongraphics.co.uk/tutorials/create-a-cute-vector-reindeer-character-in-illustrator
[img]http://www.blog.spoongraphics.co.uk/wp-content/uploads/2010/reindeer/reindeer-character-sm.jpg[/img]
[hr]
10.以Illustrator創造一個向量的優雅貓頭鷹圖案│http://blog.spoongraphics.co.uk/tutorials/create-an-elegant-patterned-vector-owl-in-illustrator
[img]http://www.blog.spoongraphics.co.uk/wp-content/uploads/2010/illustrated-owl/vector-owl-sm.jpg[/img]
[hr]
11.創建一個簡單的技工│http://blog.spoongraphics.co.uk/tutorials/create-a-simple-mechanic-character-in-illustrator
適合初學者的向量角色繪製
[img]http://www.blog.spoongraphics.co.uk/wp-content/uploads/2010/mechanic-character/mechanic-character-sm.png[/img]
[hr]
12.可愛老虎繪製│http://designinformer.smashingmagazine.com/2010/01/20/create-a-cute-little-tiger-in-illustrator/
[img]http://api.photoshop.com/v1.0/accounts/ce623456af6a4e469a7d88bc2b85162c/assets/15f1bb7b69da400b9d214fa59a59d0c9[/img]
Changed By: JinJin
Change Date: March 22, 2012 12:09AM
[講義] Illustrator 角色繪製
Change Date: March 22, 2012 12:09AM
[講義] Illustrator 角色繪製
<h2>Illustrator角色建立示範</h2>
<h3>設計簡潔的向量熊貓角色</h3>
http://blog.spoongraphics.co.uk/tutorials/create-a-cool-vector-panda-character-in-illustrator
原創來自克里斯斯普納的的教程。
利用幾個簡單的圖形、善用顏色漸層級漸變工具、以及善用陰影,不用出現外框,就可以創造出簡潔生動的角色。
這個練習雖然看似簡單,但每位同學都要練習,學習以漸層與陰影取代外框,製作高質感的簡易插畫。
[img]http://www.blog.spoongraphics.co.uk/wp-content/uploads/2010/panda/01.jpg[/img]
[img]http://www.blog.spoongraphics.co.uk/wp-content/uploads/2010/panda/vector-panda-character.jpg[/img]
[hr]
1.使用橢圓工具,搭配Shift鍵,畫出一正圓
[IMG]http://i556.photobucket.com/albums/ss1/whc915/panda001.jpg[/IMG]
[hr]
2.使用直接選取工具,點選最上端的空心點,向下垂直拖曳
[IMG]http://i556.photobucket.com/albums/ss1/whc915/panda002.jpg[/IMG]
[hr]
3.再繪製另一個較小的圓,以類似的做法完成鼻子的輪廓
[IMG]http://i556.photobucket.com/albums/ss1/whc915/panda003.jpg[/IMG]
[IMG]http://i556.photobucket.com/albums/ss1/whc915/panda004.jpg[/IMG]
[hr]
4.接著同樣以橢圓工具搭配Shift鍵畫出一正圓,右側靠在鼻子的中心點上
[IMG]http://i556.photobucket.com/albums/ss1/whc915/panda005.jpg[/IMG]
將鼻子按右鍵→排列順序→置在最前
再將剛剛正圓按Alt鍵,對稱複製於右側
[IMG]http://i556.photobucket.com/albums/ss1/whc915/panda006.jpg[/IMG]
[hr]
5.接著同樣以橢圓工具搭配Shift鍵畫出一正圓,繪製大大的眼睛
[IMG]http://i556.photobucket.com/albums/ss1/whc915/panda007.jpg[/IMG]
[hr]
6.選取大圓眼,物件→變形→縮放→70%→拷貝
[IMG]http://i556.photobucket.com/albums/ss1/whc915/panda008.jpg[/IMG]
[hr]
7.再複製65%,將此圓,移動,接著繪製更小的圓,製作眼球中的亮點
[IMG]http://i556.photobucket.com/albums/ss1/whc915/panda009.jpg[/IMG]
[hr]
8.選取整組眼睛,Shift+Alt→水平移動複製到右邊
[IMG]http://i556.photobucket.com/albums/ss1/whc915/panda011.jpg[/IMG]
[hr]
9.接著製作耳朵,一樣用橢圓工具製作
[IMG]http://i556.photobucket.com/albums/ss1/whc915/panda012.jpg[/IMG]
[IMG]http://i556.photobucket.com/albums/ss1/whc915/panda013.jpg[/IMG]
[IMG]http://i556.photobucket.com/albums/ss1/whc915/panda014.jpg[/IMG]
[hr]
10.接著製作身體
[IMG]http://i556.photobucket.com/albums/ss1/whc915/panda015.jpg[/IMG]
[IMG]http://i556.photobucket.com/albums/ss1/whc915/panda016.jpg[/IMG]
[IMG]http://i556.photobucket.com/albums/ss1/whc915/panda017.jpg[/IMG]
[IMG]http://i556.photobucket.com/albums/ss1/whc915/panda018.jpg[/IMG]
[IMG]http://i556.photobucket.com/albums/ss1/whc915/panda019.jpg[/IMG]
[IMG]http://i556.photobucket.com/albums/ss1/whc915/panda020.jpg[/IMG]
[IMG]http://i556.photobucket.com/albums/ss1/whc915/panda021.jpg[/IMG]
[IMG]http://i556.photobucket.com/albums/ss1/whc915/panda022.jpg[/IMG]
[hr]
11.黑框線稿完成
[IMG]http://i556.photobucket.com/albums/ss1/whc915/panda023.jpg[/IMG]
[hr]
上色時,善用漸層工具,將可輕鬆取代外框線稿,並產生豐富生動的效果
[IMG]http://i556.photobucket.com/albums/ss1/whc915/panda024.jpg[/IMG]
[IMG]http://i556.photobucket.com/albums/ss1/whc915/panda026.jpg[/IMG]
[IMG]http://i556.photobucket.com/albums/ss1/whc915/panda027.jpg[/IMG]
[hr]
製作眼睛外框的陰影,效果→風格化→製作陰影
[IMG]http://i556.photobucket.com/albums/ss1/whc915/panda029.jpg[/IMG]
[hr]
頭部及手部的陰影,則可多繪製一個區塊,選擇→效果→模糊→高斯模糊
[IMG]http://i556.photobucket.com/albums/ss1/whc915/panda030.jpg[/IMG]
再加上透明度約15%左右,可適當調整至適中
[IMG]http://i556.photobucket.com/albums/ss1/whc915/panda031.jpg[/IMG]
[hr]
完成稿
[IMG]http://i556.photobucket.com/albums/ss1/whc915/panda032.jpg[/IMG]
[hr]
[color=#993300]※補充說明:[/color]
<b>[color=#009999]「漸層」工具[/color]</b>
「漸層」工具可提供與「漸層」面板大致相同的功能。可以使用漸層註解者修改線性漸層的角度、位置和擴散,或修改放射性漸層的焦點、原點和擴散。按兩下個別漸層色標可以指定新的色彩設定和不透明度設定,或將漸層色標拖移到新的位置。
將指標放在漸層上方並出現旋轉游標時,可以拖移來重新放置漸層角度。拖移漸層滑桿的圓形端點可重新放置漸層原點,而拖移箭頭端點可增加或減少漸層範圍。
[img]http://help.adobe.com/zh_TW/illustrator/cs/using/images/pt_48.png[/img]
[hr]
[url=http://mepopedia.com/forum/file.php?991,file=1038,filename=panda--_.ai]Panda線搞[img]http://www.blog.spoongraphics.co.uk/wp-content/uploads/2010/illustrated-owl/vector-owl-sm.jpg[/img]
/albums/ss1/whc915/ma015.jpg />
<img width=50% src=http://i556.photobucket.com/albums/ss1/whc915/ma016.jpg />
<img width=50% src=http://i556.photobucket.com/albums/ss1/whc915/ma017.jpg />
<img width=50% src=http://i556.photobucket.com/albums/ss1/whc915/ma018.jpg />
<img width=50% src=http://i556.photobucket.com/albums/ss1/whc915/ma019.jpg />
<img width=50% src=http://i556.photobucket.com/albums/ss1/whc915/ma020.jpg />
<img width=50% src=http://i556.photobucket.com/albums/ss1/whc915/ma021.jpg />
<img width=50% src=http://i556.photobucket.com/albums/ss1/whc915/ma022.jpg />
<img width=50% src=http://i556.photobucket.com/albums/ss1/whc915/ma023.jpg />
<img width=50% src=http://i556.photobucket.com/albums/ss1/whc915/ma024.jpg />
<img width=50% src=http://i556.photobucket.com/albums/ss1/whc915/ma025.jpg />
<img width=50% src=http://i556.photobucket.com/albums/ss1/whc915/ma026.jpg />
<img width=50% src=http://i556.photobucket.com/albums/ss1/whc915/ma027.jpg />
<img width=50% src=http://i556.photobucket.com/albums/ss1/whc915/ma028.jpg />
<img width=50% src=http://i556.photobucket.com/albums/ss1/whc915/ma029.jpg />
<img width=50% src=http://i556.photobucket.com/albums/ss1/whc915/ma030.jpg />
<img width=50% src=http://i556.photobucket.com/albums/ss1/whc915/ma031.jpg />
<img width=50% src=http://i556.photobucket.com/albums/ss1/whc915/ma032.jpg />
<img width=50% src=http://i556.photobucket.com/albums/ss1/whc915/ma033.jpg />
<img width=50% src=http://i556.photobucket.com/albums/ss1/whc915/ma034.jpg />
<img width=50% src=http://i556.photobucket.com/albums/ss1/whc915/ma035.jpg />
<img width=50% src=http://i556.photobucket.com/albums/ss1/whc915/ma036.jpg />
<img width=50% src=http://i556.photobucket.com/albums/ss1/whc915/ma037.jpg />
<img width=50% src=http://i556.photobucket.com/albums/ss1/whc915/ma038.jpg />
<img width=50% src=http://i556.photobucket.com/albums/ss1/whc915/ma039.jpg />
<img width=50% src=http://i556.photobucket.com/albums/ss1/whc915/ma040.jpg />
<img width=50% src=http://i556.photobucket.com/albums/ss1/whc915/ma041.jpg />
<img width=50% src=http://i556.photobucket.com/albums/ss1/whc915/ma042.jpg />
<img width=50% src=http://i556.photobucket.com/albums/ss1/whc915/ma043.jpg />
<img width=50% src=http://i556.photobucket.com/albums/ss1/whc915/ma044.jpg />
<img width=50% src=http://i556.photobucket.com/albums/ss1/whc915/ma045.jpg />
<img width=50% src=http://i556.photobucket.com/albums/ss1/whc915/ma046.jpg />
<img width=50% src=http://i556.photobucket.com/albums/ss1/whc915/ma047.jpg />
<img width=50% src=http://i556.photobucket.com/albums/ss1/whc915/ma048.jpg />
<img width=50% src=http://i556.photobucket.com/albums/ss1/whc915/ma049.jpg />
<img width=50% src=http://i556.photobucket.com/albums/ss1/whc915/ma050.jpg />
<img width=50% src=http://i556.photobucket.com/albums/ss1/whc915/ma051.jpg />
<img width=50% src=http://i556.photobucket.com/albums/ss1/whc915/ma052.jpg />
<img width=50% src=http://i556.photobucket.com/albums/ss1/whc915/ma053.jpg />
<img width=50% src=http://i556.photobucket.com/albums/ss1/whc915/ma054.jpg />
<img width=50% src=http://i556.photobucket.com/albums/ss1/whc915/ma055.jpg />
<img width=50% src=http://i556.photobucket.com/albums/ss1/whc915/ma056.jpg />
<img width=50% src=http://i556.photobucket.com/albums/ss1/whc915/ma057.jpg />
<img width=50% src=http://i556.photobucket.com/albums/ss1/whc915/ma058.jpg />
<img width=50% src=http://i556.photobucket.com/albums/ss1/whc915/ma059.jpg />
[hr]
置入photoshop
<img width=50% src=http://i556.photobucket.com/albums/ss1/whc915/ma064.jpg />
<img width=50% src=http://i556.photobucket.com/albums/ss1/whc915/ma065.jpg />
<img width=50% src=http://i556.photobucket.com/albums/ss1/whc915/ma066.jpg />
<img width=50% src=http://i556.photobucket.com/albums/ss1/whc915/ma067.jpg />
[hr]
完成品
<img width=50% src=http://i556.photobucket.com/albums/ss1/whc915/ma068.jpg />
com/albums/ss1/whc915/ma047.jpg />
<img width=50% src=http://i556.photobucket.com/albums/ss1/whc915/ma048.jpg />
<img width=50% src=http://i556.photobucket.com/albums/ss1/whc915/ma049.jpg />
<img width=50% src=http://i556.photobucket.com/albums/ss1/whc915/ma050.jpg />
<img width=50% src=http://i556.photobucket.com/albums/ss1/whc915/ma051.jpg />
<img width=50% src=http://i556.photobucket.com/albums/ss1/whc915/ma052.jpg />
<img width=50% src=http://i556.photobucket.com/albums/ss1/whc915/ma053.jpg />
<img width=50% src=http://i556.photobucket.com/albums/ss1/whc915/ma054.jpg />
<img width=50% src=http://i556.photobucket.com/albums/ss1/whc915/ma055.jpg />
<img width=50% src=http://i556.photobucket.com/albums/ss1/whc915/ma056.jpg />
<img width=50% src=http://i556.photobucket.com/albums/ss1/whc915/ma057.jpg />
<img width=50% src=http://i556.photobucket.com/albums/ss1/whc915/ma058.jpg />
<img width=50% src=http://i556.photobucket.com/albums/ss1/whc915/ma059.jpg />
[hr]
置入photoshop
<img width=50% src=http://i556.photobucket.com/albums/ss1/whc915/ma064.jpg />
<img width=50% src=http://i556.photobucket.com/albums/ss1/whc915/ma065.jpg />
<img width=50% src=http://i556.photobucket.com/albums/ss1/whc915/ma066.jpg />
<img width=50% src=http://i556.photobucket.com/albums/ss1/whc915/ma067.jpg />
[hr]
完成品
<img width=50% src=http://i556.photobucket.com/albums/ss1/whc915/ma068.jpg />
[hr]
<h2>其他網路教程參考範例</h2>
網路上有許多專業且多樣風格的角色繪製技巧,同學們可以選擇自己喜歡的風格或繪製方式,試著按照教程自己做看看吧,相信可以從中學習許多寶貴的繪製技巧與創意發想。
[hr]
1.人物角色繪製│http://colorburned.com/2009/07/create-a-character-mascot-with-adobe-illustrator-cs4.html
[img]http://api.photoshop.com/v1.0/accounts/ce623456af6a4e469a7d88bc2b85162c/assets/17c9ccc3b3144b8bb6216be7bc5f7625[/img]
[hr]
2.可愛和簡單的河馬│http://vforvectors.com/create-a-cute-and-simple-hippo-face/
簡單的Illustrator教程橢圓工具,矩形工具,圓角矩形工具創建簡單的河馬。
[img]http://vforvectors.com/wp-content/uploads/2010/02/00.jpg[/img]
[hr]
3.Twitter鳥LOGO│ http://bloomwebdesign.net/myblog/2011/08/11/create-a-cute-twitter-bird-character-in-illustrator/
了解如何以Illustrator繪製可愛的卡通Twitter鳥。
[img]http://bloomwebdesign.net/myblog/files/2011/08/twitter-character-bird-icon-vector-illustrator-tweet.jpg[/img]
[hr]
4.向量士兵製作│ http://blog.spoongraphics.co.uk/tutorials/how-to-create-a-vector-soldier-character-in-illustrator
下面的教程教你如何以 Illustrator 創建可愛的向量士兵。
[img]http://www.blog.spoongraphics.co.uk/wp-content/uploads/2011/soldier-character/vector-soldier-character.jpg[/img]
[hr]
5.使用Illustrator創建一個條紋的貓│ http://www.cutelittlefactory.com/tutorials/create-a-tiger-striped-cat-with-illustrator/
[img]http://www.cutelittlefactory.com/wp-content/uploads/2010/07/final.jpg[/img]
[hr]
6.在Illustrator中創建的│ http://blog.spoongraphics.co.uk/tutorials/create-a-cool-vector-robot-character-in-illustrator
想學習Adobe Illustrator中的基本的向量機器人嗎?在本教程中,您將使用各種工具和技術來創建一個簡單的向量機器人。這個機器人使用大量的基本形狀,適合初學者掌握與Illustrator的應用程序。
[img]http://www.blog.spoongraphics.co.uk/wp-content/uploads/2011/robot/robot-character-sm.jpg[/img]
[hr]
7.頭巾娃娃│http://bloomwebdesign.net/myblog/2011/04/14/design-a-babushka-doll-in-illustrator/
如何在Illustrator中,建立東歐模式的頭巾娃娃。
[img]http://bloomwebdesign.net/myblog/files/2011/04/babushka-doll-design-vector.jpg[/img]
[hr]
8.可愛的小豬撲滿│http://www.noupe.com/tutorial/how-to-create-a-cute-piggy-bank-in-perspective-with-adobe-illustrator.html
創建一個可愛的粉紅色的小豬撲滿。
[img]http://media.noupe.com//uploads/2011/03/0352_500px.jpg[/img]
[hr]
9.創建一個可愛的向量馴鹿│ http://blog.spoongraphics.co.uk/tutorials/create-a-cute-vector-reindeer-character-in-illustrator
[img]http://www.blog.spoongraphics.co.uk/wp-content/uploads/2010/reindeer/reindeer-character-sm.jpg[/img]
[hr]
10.以Illustrator創造一個向量的優雅貓頭鷹圖案│http://blog.spoongraphics.co.uk/tutorials/create-an-elegant-patterned-vector-owl-in-illustrator
[img]http://www.blog.spoongraphics.co.uk/wp-content/uploads/2010/illustrated-owl/vector-owl-sm.jpg[/img]
[hr]
11.創建一個簡單的技工│http://blog.spoongraphics.co.uk/tutorials/create-a-simple-mechanic-character-in-illustrator
適合初學者的向量角色繪製
[img]http://www.blog.spoongraphics.co.uk/wp-content/uploads/2010/mechanic-character/mechanic-character-sm.png[/img]
[hr]
12.可愛老虎繪製│http://designinformer.smashingmagazine.com/2010/01/20/create-a-cute-little-tiger-in-illustrator/
[img]http://api.photoshop.com/v1.0/accounts/ce623456af6a4e469a7d88bc2b85162c/assets/15f1bb7b69da400b9d214fa59a59d0c9[/img]
Changed By: JinJin
Change Date: March 21, 2012 09:46AM
[講義] Illustrator 角色繪製
Change Date: March 21, 2012 09:46AM
[講義] Illustrator 角色繪製
<h2>Illustrator角色建立示範</h2>
1.設計簡潔的向量熊<h3│
>設計簡潔的向量熊貓角色</h3>
http://blog.spoongraphics.co.uk/tutorials/create-a-cool-vector-panda-character-in-illustrator
原創來自克里斯斯普納的的教程。
利用幾個簡單的圖形、善用顏色漸層級漸變工具、以及善用陰影,不用出現外框,就可以創造出簡潔生動的角色。
這個練習雖然看似簡單,但每位同學都要練習,學習以漸層與陰影取代外框,製作高質感的簡易插畫。
[img]http://www.blog.spoongraphics.co.uk/wp-content/uploads/2010/panda/01.jpg[/img]
[img]http://www.blog.spoongraphics.co.uk/wp-content/uploads/2010/panda/vector-panda-character.jpg[/img]
[hr]
1.使用橢圓工具,搭配Shift鍵,畫出一正圓
[IMG]http://i556.photobucket.com/albums/ss1/whc915/panda001.jpg[/IMG]
[hr]
2.使用直接選取工具,點選最上端的空心點,向下垂直拖曳
[IMG]http://i556.photobucket.com/albums/ss1/whc915/panda002.jpg[/IMG]
[hr]
3.再繪製另一個較小的圓,以類似的做法完成鼻子的輪廓
[IMG]http://i556.photobucket.com/albums/ss1/whc915/panda003.jpg[/IMG]
[IMG]http://i556.photobucket.com/albums/ss1/whc915/panda004.jpg[/IMG]
[hr]
4.接著同樣以橢圓工具搭配Shift鍵畫出一正圓,右側靠在鼻子的中心點上
[IMG]http://i556.photobucket.com/albums/ss1/whc915/panda005.jpg[/IMG]
將鼻子按右鍵→排列順序→置在最前
再將剛剛正圓按Alt鍵,對稱複製於右側
[IMG]http://i556.photobucket.com/albums/ss1/whc915/panda006.jpg[/IMG]
[hr]
5.接著同樣以橢圓工具搭配Shift鍵畫出一正圓,繪製大大的眼睛
[IMG]http://i556.photobucket.com/albums/ss1/whc915/panda007.jpg[/IMG]
[hr]
6.選取大圓眼,物件→變形→縮放→70%→拷貝
[IMG]http://i556.photobucket.com/albums/ss1/whc915/panda008.jpg[/IMG]
[hr]
7.再複製65%,將此圓,移動,接著繪製更小的圓,製作眼球中的亮點
[IMG]http://i556.photobucket.com/albums/ss1/whc915/panda009.jpg[/IMG]
[hr]
8.選取整組眼睛,Shift+Alt→水平移動複製到右邊
[IMG]http://i556.photobucket.com/albums/ss1/whc915/panda011.jpg[/IMG]
[hr]
9.接著製作耳朵,一樣用橢圓工具製作
[IMG]http://i556.photobucket.com/albums/ss1/whc915/panda012.jpg[/IMG]
[IMG]http://i556.photobucket.com/albums/ss1/whc915/panda013.jpg[/IMG]
[IMG]http://i556.photobucket.com/albums/ss1/whc915/panda014.jpg[/IMG]
[hr]
10.接著製作身體
[IMG]http://i556.photobucket.com/albums/ss1/whc915/panda015.jpg[/IMG]
[IMG]http://i556.photobucket.com/albums/ss1/whc915/panda016.jpg[/IMG]
[IMG]http://i556.photobucket.com/albums/ss1/whc915/panda017.jpg[/IMG]
[IMG]http://i556.photobucket.com/albums/ss1/whc915/panda018.jpg[/IMG]
[IMG]http://i556.photobucket.com/albums/ss1/whc915/panda019.jpg[/IMG]
[IMG]http://i556.photobucket.com/albums/ss1/whc915/panda020.jpg[/IMG]
[IMG]http://i556.photobucket.com/albums/ss1/whc915/panda021.jpg[/IMG]
[IMG]http://i556.photobucket.com/albums/ss1/whc915/panda022.jpg[/IMG]
[hr]
11.黑框線稿完成
[IMG]http://i556.photobucket.com/albums/ss1/whc915/panda023.jpg[/IMG]
[hr]
上色時,善用漸層工具,將可輕鬆取代外框線稿,並產生豐富生動的效果
[IMG]http://i556.photobucket.com/albums/ss1/whc915/panda024.jpg[/IMG]
[IMG]http://i556.photobucket.com/albums/ss1/whc915/panda026.jpg[/IMG]
[IMG]http://i556.photobucket.com/albums/ss1/whc915/panda027.jpg[/IMG]
[hr]
製作眼睛外框的陰影,效果→風格化→製作陰影
[IMG]http://i556.photobucket.com/albums/ss1/whc915/panda029.jpg[/IMG]
[hr]
頭部及手部的陰影,則可多繪製一個區塊,選擇→效果→模糊→高斯模糊
[IMG]http://i556.photobucket.com/albums/ss1/whc915/panda030.jpg[/IMG]
再加上透明度約15%左右,可適當調整至適中
[IMG]http://i556.photobucket.com/albums/ss1/whc915/panda031.jpg[/IMG]
[hr]
完成稿
[IMG]http://i556.photobucket.com/albums/ss1/whc915/panda032.jpg[/IMG]
[hr]
[color=#993300]※補充說明:[/color]
<b>[color=#009999]「漸層」工具[/color]</b>
「漸層」工具可提供與「漸層」面板大致相同的功能。可以使用漸層註解者修改線性漸層的角度、位置和擴散,或修改放射性漸層的焦點、原點和擴散。按兩下個別漸層色標可以指定新的色彩設定和不透明度設定,或將漸層色標拖移到新的位置。
將指標放在漸層上方並出現旋轉游標時,可以拖移來重新放置漸層角度。拖移漸層滑桿的圓形端點可重新放置漸層原點,而拖移箭頭端點可增加或減少漸層範圍。
[img]http://help.adobe.com/zh_TW/[hr]
<h2>其他網路教程參考範例</h2>
網路上有許多專業且多樣風格的角色繪製技巧,同學們可以選擇自己喜歡的風格或繪製方式,試著按照教程自己做看看吧,相信可以從中學習許多寶貴的繪製技巧與創意發想。
[hr]
1.人物角色繪製│http://colorburned.com/2009/07/create-a-character-mascot-with-adobe-illustrator-cs4.html
[img]http://api.photoshop.com/v1.0/accounts/ce623456af6a4e469a7d88bc2b85162c/assets/17c9ccc3b3144b8bb6216be7bc5f7625[/img]
[hr]
2.可愛和簡單的河馬│http://vforvectors.com/create-a-cute-and-simple-hippo-face/
簡單的Illustrator教程橢圓工具,矩形工具,圓角矩形工具創建簡單的河馬。
[img]http://vforvectors.com/wp-content/uploads/2010/02/00.jpg[/img]
[hr]
3.Twitter鳥LOGO│ http://bloomwebdesign.net/myblog/2011/08/11/create-a-cute-twitter-bird-character-in-illustrator/
了解如何以Illustrator繪製可愛的卡通Twitter鳥。
[img]http://bloomwebdesign.net/myblog/files/2011/08/twitter-character-bird-icon-vector-illustrator-tweet.jpg[/img]
[hr]
4.向量士兵製作│ http://blog.spoongraphics.co.uk/tutorials/how-to-create-a-vector-soldier-character-in-illustrator
下面的教程教你如何以 Illustrator 創建可愛的向量士兵。
[img]http://www.blog.spoongraphics.co.uk/wp-content/uploads/2011/soldier-character/vector-soldier-character.jpg[/img]
log.spoongraphics.co.uk/wp-content/uploads/2011/soldier-character/vector-soldier-character.jpg[/img]
e=1038,filename=panda--_.ai]Panda線搞[img]http://www.blog.spoongraphics.co.uk/wp-content/uploads/2010/illustrated-owl/vector-owl-sm.jpg[/img]
com/albums/ss1/whc915/ma047.jpg />
<img width=50% src=http://i556.photobucket.com/albums/ss1/whc915/ma048.jpg />
<img width=50% src=http://i556.photobucket.com/albums/ss1/whc915/ma049.jpg />
<img width=50% src=http://i556.photobucket.com/albums/ss1/whc915/ma050.jpg />
<img width=50% src=http://i556.photobucket.com/albums/ss1/whc915/ma051.jpg />
<img width=50% src=http://i556.photobucket.com/albums/ss1/whc915/ma052.jpg />
<img width=50% src=http://i556.photobucket.com/albums/ss1/whc915/ma053.jpg />
<img width=50% src=http://i556.photobucket.com/albums/ss1/whc915/ma054.jpg />
<img width=50% src=http://i556.photobucket.com/albums/ss1/whc915/ma055.jpg />
<img width=50% src=http://i556.photobucket.com/albums/ss1/whc915/ma056.jpg />
<img width=50% src=http://i556.photobucket.com/albums/ss1/whc915/ma057.jpg />
<img width=50% src=http://i556.photobucket.com/albums/ss1/whc915/ma058.jpg />
<img width=50% src=http://i556.photobucket.com/albums/ss1/whc915/ma059.jpg />
[hr]
置入photoshop
<img width=50% src=http://i556.photobucket.com/albums/ss1/whc915/ma064.jpg />
<img width=50% src=http://i556.photobucket.com/albums/ss1/whc915/ma065.jpg />
<img width=50% src=http://i556.photobucket.com/albums/ss1/whc915/ma066.jpg />
<img width=50% src=http://i556.photobucket.com/albums/ss1/whc915/ma067.jpg />
[hr]
完成品
<img width=50% src=http://i556.photobucket.com/albums/ss1/whc915/ma068.jpg />
[hr]
<h2>其他網路教程參考範例</h2>
網路上有許多專業且多樣風格的角色繪製技巧,同學們可以選擇自己喜歡的風格或繪製方式,試著按照教程自己做看看吧,相信可以從中學習許多寶貴的繪製技巧與創意發想。
[hr]
1.人物角色繪製│http://colorburned.com/2009/07/create-a-character-mascot-with-adobe-illustrator-cs4.html
[img]http://api.photoshop.com/v1.0/accounts/ce623456af6a4e469a7d88bc2b85162c/assets/17c9ccc3b3144b8bb6216be7bc5f7625[/img]
[hr]
2.可愛和簡單的河馬│http://vforvectors.com/create-a-cute-and-simple-hippo-face/
簡單的Illustrator教程橢圓工具,矩形工具,圓角矩形工具創建簡單的河馬。
[img]http://vforvectors.com/wp-content/uploads/2010/02/00.jpg[/img]
[hr]
3.Twitter鳥LOGO│ http://bloomwebdesign.net/myblog/2011/08/11/create-a-cute-twitter-bird-character-in-illustrator/
了解如何以Illustrator繪製可愛的卡通Twitter鳥。
[img]http://bloomwebdesign.net/myblog/files/2011/08/twitter-character-bird-icon-vector-illustrator-tweet.jpg[/img]
[hr]
4.向量士兵製作│ http://blog.spoongraphics.co.uk/tutorials/how-to-create-a-vector-soldier-character-in-illustrator
下面的教程教你如何以 Illustrator 創建可愛的向量士兵。
[img]http://www.blog.spoongraphics.co.uk/wp-content/uploads/2011/soldier-character/vector-soldier-character.jpg[/img]
[hr]
5.使用Illustrator創建一個條紋的貓│ http://www.cutelittlefactory.com/tutorials/create-a-tiger-striped-cat-with-illustrator/
[img]http://www.cutelittlefactory.com/wp-content/uploads/2010/07/final.jpg[/img]
[hr]
6.在Illustrator中創建的│ http://blog.spoongraphics.co.uk/tutorials/create-a-cool-vector-robot-character-in-illustrator
想學習Adobe Illustrator中的基本的向量機器人嗎?在本教程中,您將使用各種工具和技術來創建一個簡單的向量機器人。這個機器人使用大量的基本形狀,適合初學者掌握與Illustrator的應用程序。
[img]http://www.blog.spoongraphics.co.uk/wp-content/uploads/2011/robot/robot-character-sm.jpg[/img]
[hr]
7.頭巾娃娃│http://bloomwebdesign.net/myblog/2011/04/14/design-a-babushka-doll-in-illustrator/
如何在Illustrator中,建立東歐模式的頭巾娃娃。
[img]http://bloomwebdesign.net/myblog/files/2011/04/babushka-doll-design-vector.jpg[/img]
[hr]
8.可愛的小豬撲滿│http://www.noupe.com/tutorial/how-to-create-a-cute-piggy-bank-in-perspective-with-adobe-illustrator.html
創建一個可愛的粉紅色的小豬撲滿。
[img]http://media.noupe.com//uploads/2011/03/0352_500px.jpg[/img]
[hr]
9.創建一個可愛的向量馴鹿│ http://blog.spoongraphics.co.uk/tutorials/create-a-cute-vector-reindeer-character-in-illustrator
[img]http://www.blog.spoongraphics.co.uk/wp-content/uploads/2010/reindeer/reindeer-character-sm.jpg[/img]
[hr]
10.以Illustrator創造一個向量的優雅貓頭鷹圖案│http://blog.spoongraphics.co.uk/tutorials/create-an-elegant-patterned-vector-owl-in-illustrator
[img]http://www.blog.spoongraphics.co.uk/wp-content/uploads/2010/illustrated-owl/vector-owl-sm.jpg[/img]
[hr]
11.創建一個簡單的技工│http://blog.spoongraphics.co.uk/tutorials/create-a-simple-mechanic-character-in-illustrator
適合初學者的向量角色繪製
[img]http://www.blog.spoongraphics.co.uk/wp-content/uploads/2010/mechanic-character/mechanic-character-sm.png[/img]
[hr]
12.可愛老虎繪製│http://designinformer.smashingmagazine.com/2010/01/20/create-a-cute-little-tiger-in-illustrator/
[img]http://api.photoshop.com/v1.0/accounts/ce623456af6a4e469a7d88bc2b85162c/assets/15f1bb7b69da400b9d214fa59a59d0c9[/img]
Changed By: JinJin
Change Date: March 14, 2012 11:38PM
[講義] Illustrator 角色繪製
Change Date: March 14, 2012 11:38PM
[講義] Illustrator 角色繪製
<h2>Illustrator角色建立示範</h2>
1.設計簡潔的向量熊<h3│
>設計簡潔的向量熊貓角色</h3>
http://blog.spoongraphics.co.uk/tutorials/create-a-cool-vector-panda-character-in-illustrator
原創來自克里斯斯普納的的教程。
利用幾個簡單的圖形、善用顏色漸層級漸變工具、以及善用陰影,不用出現外框,就可以創造出簡潔生動的角色。
這個練習雖然看似簡單,但每位同學都要練習,學習以漸層與陰影取代外框,製作高質感的簡易插畫。
[img]http://www.blog.spoongraphics.co.uk/wp-content/uploads/2010/panda/01.jpg[/img]
[img]http://www.blog.spoongraphics.co.uk/wp-content/uploads/2010/panda/vector-panda-character.jpg[/img]
[hr]
1.使用橢圓工具,搭配Shift鍵,畫出一正圓
[IMG]http://i556.photobucket.com/albums/ss1/whc915/panda001.jpg[/IMG]
[hr]
2.使用直接選取工具,點選最上端的空心點,向下垂直拖曳
[IMG]http://i556.photobucket.com/albums/ss1/whc915/panda002.jpg[/IMG]
[hr]
3.再繪製另一個較小的圓,以類似的做法完成鼻子的輪廓
[IMG]http://i556.photobucket.com/albums/ss1/whc915/panda003.jpg[/IMG]
[IMG]http://i556.photobucket.com/albums/ss1/whc915/panda004.jpg[/IMG]
[hr]
4.接著同樣以橢圓工具搭配Shift鍵畫出一正圓,右側靠在鼻子的中心點上
[IMG]http://i556.photobucket.com/albums/ss1/whc915/panda005.jpg[/IMG]
將鼻子按右鍵→排列順序→置在最前
再將剛剛正圓按Alt鍵,對稱複製於右側
[IMG]http://i556.photobucket.com/albums/ss1/whc915/panda006.jpg[/IMG]
[hr]
5.接著同樣以橢圓工具搭配Shift鍵畫出一正圓,繪製大大的眼睛
[IMG]http://i556.photobucket.com/albums/ss1/whc915/panda007.jpg[/IMG]
[hr]
6.選取大圓眼,物件→變形→縮放→70%→拷貝
[IMG]http://i556.photobucket.com/albums/ss1/whc915/panda008.jpg[/IMG]
[hr]
7.再複製65%,將此圓,移動,接著繪製更小的圓,製作眼球中的亮點
[IMG]http://i556.photobucket.com/albums/ss1/whc915/panda009.jpg[/IMG]
[hr]
8.選取整組眼睛,Shift+Alt→水平移動複製到右邊
[IMG]http://i556.photobucket.com/albums/ss1/whc915/panda011.jpg[/IMG]
[hr]
9.接著製作耳朵,一樣用橢圓工具製作
[IMG]http://i556.photobucket.com/albums/ss1/whc915/panda012.jpg[/IMG]
[IMG]http://i556.photobucket.com/albums/ss1/whc915/panda013.jpg[/IMG]
[IMG]http://i556.photobucket.com/albums/ss1/whc915/panda014.jpg[/IMG]
[hr]
10.接著製作身體
[IMG]http://i556.photobucket.com/albums/ss1/whc915/panda015.jpg[/IMG]
[IMG]http://i556.photobucket.com/albums/ss1/whc915/panda016.jpg[/IMG]
[IMG]http://i556.photobucket.com/albums/ss1/whc915/panda017.jpg[/IMG]
[IMG]http://i556.photobucket.com/albums/ss1/whc915/panda018.jpg[/IMG]
[IMG]http://i556.photobucket.com/albums/ss1/whc915/panda019.jpg[/IMG]
[IMG]http://i556.photobucket.com/albums/ss1/whc915/panda020.jpg[/IMG]
[IMG]http://i556.photobucket.com/albums/ss1/whc915/panda021.jpg[/IMG]
[IMG]http://i556.photobucket.com/albums/ss1/whc915/panda022.jpg[/IMG]
[hr]
11.黑框線稿完成
[IMG]http://i556.photobucket.com/albums/ss1/whc915/panda023.jpg[/IMG]
[hr]
上色時,善用漸層工具,將可輕鬆取代外框線稿,並產生豐富生動的效果
[IMG]http://i556.photobucket.com/albums/ss1/whc915/panda024.jpg[/IMG]
[IMG]http://i556.photobucket.com/albums/ss1/whc915/panda026.jpg[/IMG]
[IMG]http://i556.photobucket.com/albums/ss1/whc915/panda027.jpg[/IMG]
[hr]
製作眼睛外框的陰影,效果→風格化→製作陰影
[IMG]http://i556.photobucket.com/albums/ss1/whc915/panda029.jpg[/IMG]
[hr]
頭部及手部的陰影,則可多繪製一個區塊,選擇→效果→模糊→高斯模糊
[IMG]http://i556.photobucket.com/albums/ss1/whc915/panda030.jpg[/IMG]
再加上透明度約15%左右,可適當調整至適中
[IMG]http://i556.p[IMG]http://i556.photobucket.com/albums/ss1/whc915/panda035.jpg[/IMG]
hotobucket.com/albums/ss1/whc915/panda031.jpg[/IMG]
[hr]
完成稿
[IMG]http://i556.photobucket.com/albums/ss1/whc915/panda032.jpg[/IMG]
[hr]
[color=#993300]※補充說明:[/color]
<b>[color=#009999]「漸層」工具[/color]</b>
「漸層」工具可提供與「漸層」面板大致相同的功能。可以使用漸層註解者修改線性漸層的角度、位置和擴散,或修改放射性漸層的焦點、原點和擴散。按兩下個別漸層色標可以指定新的色彩設定和不透明度設定,或將漸層色標拖移到新的位置。
將指標放在漸層上方並出現旋轉游標時,可以拖移來重新放置漸層角度。拖移漸層滑桿的圓形端點可重新放置漸層原點,而拖移箭頭端點可增加或減少漸層範圍。
[img]http://help.adobe.com/zh_TW/[hr]
<h2>其他網路教程參考範例</h2>
網路上有許多專業且多樣風格的角色繪製技巧,同學們可以選擇自己喜歡的風格或繪製方式,試著按照教程自己做看看吧,相信可以從中學習許多寶貴的繪製技巧與創意發想。
[hr]
1.人物角色繪製│http://colorburned.com/2009/07/create-a-character-mascot-with-adobe-illustrator-cs4.html
[img]http://api.photoshop.com/v1.0/accounts/ce623456af6a4e469a7d88bc2b85162c/assets/17c9ccc3b3144b8bb6216be7bc5f7625[/img]
[hr]
2.可愛和簡單的河馬│http://vforvectors.com/create-a-cute-and-simple-hippo-face/
簡單的Illustrator教程橢圓工具,矩形工具,圓角矩形工具創建簡單的河馬。
[img]http://vforvectors.com/wp-content/uploads/2010/02/00.jpg[/img]
[hr]
3.Twitter鳥LOGO│ http://bloomwebdesign.net/myblog/2011/08/11/create-a-cute-twitter-bird-character-in-illustrator/
了解如何以Illustrator繪製可愛的卡通Twitter鳥。
[img]http://bloomwebdesign.net/myblog/files/2011/08/twitter-character-bird-icon-vector-illustrator-tweet.jpg[/img]
[hr]
4.向量士兵製作│ http://blog.spoongraphics.co.uk/tutorials/how-to-create-a-vector-soldier-character-in-illustrator
下面的教程教你如何以 Illustrator 創建可愛的向量士兵。
[img]http://www.blog.spoongraphics.co.uk/wp-content/uploads/2011/soldier-character/vector-soldier-character.jpg[/img]
e=1038,filename=panda--_.ai]Panda線搞[img]http://www.blog.spoongraphics.co.uk/wp-content/uploads/2010/illustrated-owl/vector-owl-sm.jpg[/img]
com/albums/ss1/whc915/ma047.jpg />
<img width=50% src=http://i556.photobucket.com/albums/ss1/whc915/ma048.jpg />
<img width=50% src=http://i556.photobucket.com/albums/ss1/whc915/ma049.jpg />
<img width=50% src=http://i556.photobucket.com/albums/ss1/whc915/ma050.jpg />
<img width=50% src=http://i556.photobucket.com/albums/ss1/whc915/ma051.jpg />
<img width=50% src=http://i556.photobucket.com/albums/ss1/whc915/ma052.jpg />
<img width=50% src=http://i556.photobucket.com/albums/ss1/whc915/ma053.jpg />
<img width=50% src=http://i556.photobucket.com/albums/ss1/whc915/ma054.jpg />
<img width=50% src=http://i556.photobucket.com/albums/ss1/whc915/ma055.jpg />
<img width=50% src=http://i556.photobucket.com/albums/ss1/whc915/ma056.jpg />
<img width=50% src=http://i556.photobucket.com/albums/ss1/whc915/ma057.jpg />
<img width=50% src=http://i556.photobucket.com/albums/ss1/whc915/ma058.jpg />
<img width=50% src=http://i556.photobucket.com/albums/ss1/whc915/ma059.jpg />
[hr]
置入photoshop
<img width=50% src=http://i556.photobucket.com/albums/ss1/whc915/ma064.jpg />
<img width=50% src=http://i556.photobucket.com/albums/ss1/whc915/ma065.jpg />
<img width=50% src=http://i556.photobucket.com/albums/ss1/whc915/ma066.jpg />
<img width=50% src=http://i556.photobucket.com/albums/ss1/whc915/ma067.jpg />
[hr]
完成品
<img width=50% src=http://i556.photobucket.com/albums/ss1/whc915/ma068.jpg />
[hr]
<h2>其他網路教程參考範例</h2>
網路上有許多專業且多樣風格的角色繪製技巧,同學們可以選擇自己喜歡的風格或繪製方式,試著按照教程自己做看看吧,相信可以從中學習許多寶貴的繪製技巧與創意發想。
[hr]
1.人物角色繪製│http://colorburned.com/2009/07/create-a-character-mascot-with-adobe-illustrator-cs4.html
[img]http://api.photoshop.com/v1.0/accounts/ce623456af6a4e469a7d88bc2b85162c/assets/17c9ccc3b3144b8bb6216be7bc5f7625[/img]
[hr]
2.可愛和簡單的河馬│http://vforvectors.com/create-a-cute-and-simple-hippo-face/
簡單的Illustrator教程橢圓工具,矩形工具,圓角矩形工具創建簡單的河馬。
[img]http://vforvectors.com/wp-content/uploads/2010/02/00.jpg[/img]
[hr]
3.Twitter鳥LOGO│ http://bloomwebdesign.net/myblog/2011/08/11/create-a-cute-twitter-bird-character-in-illustrator/
了解如何以Illustrator繪製可愛的卡通Twitter鳥。
[img]http://bloomwebdesign.net/myblog/files/2011/08/twitter-character-bird-icon-vector-illustrator-tweet.jpg[/img]
[hr]
4.向量士兵製作│ http://blog.spoongraphics.co.uk/tutorials/how-to-create-a-vector-soldier-character-in-illustrator
下面的教程教你如何以 Illustrator 創建可愛的向量士兵。
[img]http://www.blog.spoongraphics.co.uk/wp-content/uploads/2011/soldier-character/vector-soldier-character.jpg[/img]
[hr]
5.使用Illustrator創建一個條紋的貓│ http://www.cutelittlefactory.com/tutorials/create-a-tiger-striped-cat-with-illustrator/
[img]http://www.cutelittlefactory.com/wp-content/uploads/2010/07/final.jpg[/img]
[hr]
6.在Illustrator中創建的│ http://blog.spoongraphics.co.uk/tutorials/create-a-cool-vector-robot-character-in-illustrator
想學習Adobe Illustrator中的基本的向量機器人嗎?在本教程中,您將使用各種工具和技術來創建一個簡單的向量機器人。這個機器人使用大量的基本形狀,適合初學者掌握與Illustrator的應用程序。
[img]http://www.blog.spoongraphics.co.uk/wp-content/uploads/2011/robot/robot-character-sm.jpg[/img]
[hr]
7.頭巾娃娃│http://bloomwebdesign.net/myblog/2011/04/14/design-a-babushka-doll-in-illustrator/
如何在Illustrator中,建立東歐模式的頭巾娃娃。
[img]http://bloomwebdesign.net/myblog/files/2011/04/babushka-doll-design-vector.jpg[/img]
[hr]
8.可愛的小豬撲滿│http://www.noupe.com/tutorial/how-to-create-a-cute-piggy-bank-in-perspective-with-adobe-illustrator.html
創建一個可愛的粉紅色的小豬撲滿。
[img]http://media.noupe.com//uploads/2011/03/0352_500px.jpg[/img]
[hr]
9.創建一個可愛的向量馴鹿│ http://blog.spoongraphics.co.uk/tutorials/create-a-cute-vector-reindeer-character-in-illustrator
[img]http://www.blog.spoongraphics.co.uk/wp-content/uploads/2010/reindeer/reindeer-character-sm.jpg[/img]
[hr]
10.以Illustrator創造一個向量的優雅貓頭鷹圖案│http://blog.spoongraphics.co.uk/tutorials/create-an-elegant-patterned-vector-owl-in-illustrator
[img]http://www.blog.spoongraphics.co.uk/wp-content/uploads/2010/illustrated-owl/vector-owl-sm.jpg[/img]
[hr]
11.創建一個簡單的技工│http://blog.spoongraphics.co.uk/tutorials/create-a-simple-mechanic-character-in-illustrator
適合初學者的向量角色繪製
[img]http://www.blog.spoongraphics.co.uk/wp-content/uploads/2010/mechanic-character/mechanic-character-sm.png[/img]
[hr]
12.可愛老虎繪製│http://designinformer.smashingmagazine.com/2010/01/20/create-a-cute-little-tiger-in-illustrator/
[img]http://api.photoshop.com/v1.0/accounts/ce623456af6a4e469a7d88bc2b85162c/assets/15f1bb7b69da400b9d214fa59a59d0c9[/img]
Changed By: JinJin
Change Date: March 14, 2012 11:35PM
[講義] Illustrator 角色繪製
Change Date: March 14, 2012 11:35PM
[講義] Illustrator 角色繪製
<h2>Illustrator角色建立示範</h2>
1.設計簡潔的向量熊<h3│
>設計簡潔的向量熊貓角色</h3>
http://blog.spoongraphics.co.uk/tutorials/create-a-cool-vector-panda-character-in-illustrator
原創來自克里斯斯普納的的教程。
利用幾個簡單的圖形、善用顏色漸層級漸變工具、以及善用陰影,不用出現外框,就可以創造出簡潔生動的角色。
這個練習雖然看似簡單,但每位同學都要練習,學習以漸層與陰影取代外框,製作高質感的簡易插畫。
[img]http://www.blog.spoongraphics.co.uk/wp-content/uploads/2010/panda/01.jpg[/img]
[img]http://www.blog.spoongraphics.co.uk/wp-content/uploads/2010/panda/vector-panda-character.jpg[/img]
[hr]
1.使用橢圓工具,搭配Shift鍵,畫出一正圓
[IMG]http://i556.photobucket.com/albums/ss1/whc915/panda001.jpg[/IMG]
[hr]
2.使用直接選取工具,點選最上端的空心點,向下垂直拖曳
[IMG]http://i556.photobucket.com/albums/ss1/whc915/panda002.jpg[/IMG]
[hr]
3.再繪製另一個較小的圓,以類似的做法完成鼻子的輪廓
[IMG]http://i556.photobucket.com/albums/ss1/whc915/panda003.jpg[/IMG]
[IMG]http://i556.photobucket.com/albums/ss1/whc915/panda004.jpg[/IMG]
[hr]
4.接著同樣以橢圓工具搭配Shift鍵畫出一正圓,右側靠在鼻子的中心點上
[IMG]http://i556.photobucket.com/albums/ss1/whc915/panda005.jpg[/IMG]
將鼻子按右鍵→排列順序→置在最前
再將剛剛正圓按Alt鍵,對稱複製於右側
[IMG]http://i556.photobucket.com/albums/ss1/whc915/panda006.jpg[/IMG]
[hr]
5.接著同樣以橢圓工具搭配Shift鍵畫出一正圓,繪製大大的眼睛
[IMG]http://i556.photobucket.com/albums/ss1/whc915/panda007.jpg[/IMG]
[hr]
6.選取大圓眼,物件→變形→縮放→70%→拷貝
[IMG]http://i556.photobucket.com/albums/ss1/whc915/panda008.jpg[/IMG]
[hr]
7.再複製65%,將此圓,移動,接著繪製更小的圓,製作眼球中的亮點
[IMG]http://i556.photobucket.com/albums/ss1/whc915/panda009.jpg[/IMG]
[hr]
8.選取整組眼睛,Shift+Alt→水平移動複製到右邊
[IMG]http://i556.photobucket.com/albums/ss1/whc915/panda011.jpg[/IMG]
[hr]
9.接著製作耳朵,一樣用橢圓工具製作
[IMG]http://i556.photobucket.com/albums/ss1/whc915/panda012.jpg[/IMG]
[IMG]http://i556.photobucket.com/albums/ss1/whc915/panda013.jpg[/IMG]
[IMG]http://i556.photobucket.com/albums/ss1/whc915/panda014.jpg[/IMG]
[hr]
10.接著製作身體
[IMG]http://i556.photobucket.com/albums/ss1/whc915/panda015.jpg[/IMG]
[IMG]http://i556.photobucket.com/albums/ss1/whc915/panda016.jpg[/IMG]
[IMG]http://i556.photobucket.com/albums/ss1/whc915/panda017.jpg[/IMG]
[IMG]http://i556.photobucket.com/albums/ss1/whc915/panda018.jpg[/IMG]
[IMG]http://i556.photobucket.com/albums/ss1/whc915/panda019.jpg[/IMG]
[IMG]http://i556.photobucket.com/albums/ss1/whc915/panda020.jpg[/IMG]
[IMG]http://i556.photobucket.com/albums/ss1/whc915/panda021.jpg[/IMG]
[IMG]http://i556.photobucket.com/albums/ss1/whc915/panda022.jpg[/IMG]
[hr]
11.黑框線稿完成
[IMG]http://i556.photobucket.com/albums/ss1/whc915/panda023.jpg[/IMG]
[hr]
上色時,善用漸層工具,將可輕鬆取代外框線稿,並產生豐富生動的效果
[IMG]http://i556.photobucket.com/albums/ss1/whc915/panda024.jpg[/IMG]
[IMG]http://i556.photobucket.com/albums/ss1/whc915/panda026.jpg[/IMG]
[IMG]http://i556.photobucket.com/albums/ss1/whc915/panda027.jpg[/IMG]
[hr]
製作眼睛外框的陰影,效果→風格化→製作陰影
[IMG]http://i556.photobucket.com/albums/ss1/whc915/panda029.jpg[/IMG]
[hr]
頭部及手部的陰影,則可多繪製一個區塊,選擇→效果→模糊→高斯模糊
[IMG]http://i556.photobucket.com/albums/ss1/whc915/panda030.jpg[/IMG]
再加上透明度約15%左右,可適當調整至適中
[IMG]http://i556.p[IMG]http://i556.photobucket.com/albums/ss1/whc915/panda033.jpg[/IMG]
[IMG]http://i556.photobucket.com/albums/ss1/whc915/panda035.jpg[/IMG]
hotobucket.com/albums/ss1/whc915/panda031.jpg[/IMG]
[hr]
完成稿
[IMG]http://i556.photobucket.com/albums/ss1/whc915/panda032.jpg[/IMG]
[hr]
[color=#993300]※補充說明:[/color]
<b>[color=#009999]「漸層」工具[/color]</b>
「漸層」工具可提供與「漸層」面板大致相同的功能。可以使用漸層註解者修改線性漸層的角度、位置和擴散,或修改放射性漸層的焦點、原點和擴散。按兩下個別漸層色標可以指定新的色彩設定和不透明度設定,或將漸層色標拖移到新的位置。
將指標放在漸層上方並出現旋轉游標時,可以拖移來重新放置漸層角度。拖移漸層滑桿的圓形端點可重新放置漸層原點,而拖移箭頭端點可增加或減少漸層範圍。
[img]http://help.adobe.com/zh_TW/[hr]
<h2>其他網路教程參考範例</h2>
網路上有許多專業且多樣風格的角色繪製技巧,同學們可以選擇自己喜歡的風格或繪製方式,試著按照教程自己做看看吧,相信可以從中學習許多寶貴的繪製技巧與創意發想。
[hr]
1.人物角色繪製│http://colorburned.com/2009/07/create-a-character-mascot-with-adobe-illustrator-cs4.html
[img]http://api.photoshop.com/v1.0/accounts/ce623456af6a4e469a7d88bc2b85162c/assets/17c9ccc3b3144b8bb6216be7bc5f7625[/img]
[hr]
2.可愛和簡單的河馬│http://vforvectors.com/create-a-cute-and-simple-hippo-face/
簡單的Illustrator教程橢圓工具,矩形工具,圓角矩形工具創建簡單的河馬。
[img]http://vforvectors.com/wp-content/uploads/2010/02/00.jpg[/img]
[hr]
3.Twitter鳥LOGO│ http://bloomwebdesign.net/myblog/2011/08/11/create-a-cute-twitter-bird-character-in-illustrator/
了解如何以Illustrator繪製可愛的卡通Twitter鳥。
[img]http://bloomwebdesign.net/myblog/files/2011/08/twitter-character-bird-icon-vector-illustrator-tweet.jpg[/img]
[hr]
4.向量士兵製作│ http://blog.spoongraphics.co.uk/tutorials/how-to-create-a-vector-soldier-character-in-illustrator
下面的教程教你如何以 Illustrator 創建可愛的向量士兵。
[img]http://www.blog.spoongraphics.co.uk/wp-content/uploads/2011/soldier-character/vector-soldier-character.jpg[/img]
e=1038,filename=panda--_.ai]Panda線搞[img]http://www.blog.spoongraphics.co.uk/wp-content/uploads/2010/illustrated-owl/vector-owl-sm.jpg[/img]
com/albums/ss1/whc915/ma047.jpg />
<img width=50% src=http://i556.photobucket.com/albums/ss1/whc915/ma048.jpg />
<img width=50% src=http://i556.photobucket.com/albums/ss1/whc915/ma049.jpg />
<img width=50% src=http://i556.photobucket.com/albums/ss1/whc915/ma050.jpg />
<img width=50% src=http://i556.photobucket.com/albums/ss1/whc915/ma051.jpg />
<img width=50% src=http://i556.photobucket.com/albums/ss1/whc915/ma052.jpg />
<img width=50% src=http://i556.photobucket.com/albums/ss1/whc915/ma053.jpg />
<img width=50% src=http://i556.photobucket.com/albums/ss1/whc915/ma054.jpg />
<img width=50% src=http://i556.photobucket.com/albums/ss1/whc915/ma055.jpg />
<img width=50% src=http://i556.photobucket.com/albums/ss1/whc915/ma056.jpg />
<img width=50% src=http://i556.photobucket.com/albums/ss1/whc915/ma057.jpg />
<img width=50% src=http://i556.photobucket.com/albums/ss1/whc915/ma058.jpg />
<img width=50% src=http://i556.photobucket.com/albums/ss1/whc915/ma059.jpg />
[hr]
置入photoshop
<img width=50% src=http://i556.photobucket.com/albums/ss1/whc915/ma064.jpg />
<img width=50% src=http://i556.photobucket.com/albums/ss1/whc915/ma065.jpg />
<img width=50% src=http://i556.photobucket.com/albums/ss1/whc915/ma066.jpg />
<img width=50% src=http://i556.photobucket.com/albums/ss1/whc915/ma067.jpg />
[hr]
完成品
<img width=50% src=http://i556.photobucket.com/albums/ss1/whc915/ma068.jpg />
[hr]
<h2>其他網路教程參考範例</h2>
網路上有許多專業且多樣風格的角色繪製技巧,同學們可以選擇自己喜歡的風格或繪製方式,試著按照教程自己做看看吧,相信可以從中學習許多寶貴的繪製技巧與創意發想。
[hr]
1.人物角色繪製│http://colorburned.com/2009/07/create-a-character-mascot-with-adobe-illustrator-cs4.html
[img]http://api.photoshop.com/v1.0/accounts/ce623456af6a4e469a7d88bc2b85162c/assets/17c9ccc3b3144b8bb6216be7bc5f7625[/img]
[hr]
2.可愛和簡單的河馬│http://vforvectors.com/create-a-cute-and-simple-hippo-face/
簡單的Illustrator教程橢圓工具,矩形工具,圓角矩形工具創建簡單的河馬。
[img]http://vforvectors.com/wp-content/uploads/2010/02/00.jpg[/img]
[hr]
3.Twitter鳥LOGO│ http://bloomwebdesign.net/myblog/2011/08/11/create-a-cute-twitter-bird-character-in-illustrator/
了解如何以Illustrator繪製可愛的卡通Twitter鳥。
[img]http://bloomwebdesign.net/myblog/files/2011/08/twitter-character-bird-icon-vector-illustrator-tweet.jpg[/img]
[hr]
4.向量士兵製作│ http://blog.spoongraphics.co.uk/tutorials/how-to-create-a-vector-soldier-character-in-illustrator
下面的教程教你如何以 Illustrator 創建可愛的向量士兵。
[img]http://www.blog.spoongraphics.co.uk/wp-content/uploads/2011/soldier-character/vector-soldier-character.jpg[/img]
[hr]
5.使用Illustrator創建一個條紋的貓│ http://www.cutelittlefactory.com/tutorials/create-a-tiger-striped-cat-with-illustrator/
[img]http://www.cutelittlefactory.com/wp-content/uploads/2010/07/final.jpg[/img]
[hr]
6.在Illustrator中創建的│ http://blog.spoongraphics.co.uk/tutorials/create-a-cool-vector-robot-character-in-illustrator
想學習Adobe Illustrator中的基本的向量機器人嗎?在本教程中,您將使用各種工具和技術來創建一個簡單的向量機器人。這個機器人使用大量的基本形狀,適合初學者掌握與Illustrator的應用程序。
[img]http://www.blog.spoongraphics.co.uk/wp-content/uploads/2011/robot/robot-character-sm.jpg[/img]
[hr]
7.頭巾娃娃│http://bloomwebdesign.net/myblog/2011/04/14/design-a-babushka-doll-in-illustrator/
如何在Illustrator中,建立東歐模式的頭巾娃娃。
[img]http://bloomwebdesign.net/myblog/files/2011/04/babushka-doll-design-vector.jpg[/img]
[hr]
8.可愛的小豬撲滿│http://www.noupe.com/tutorial/how-to-create-a-cute-piggy-bank-in-perspective-with-adobe-illustrator.html
創建一個可愛的粉紅色的小豬撲滿。
[img]http://media.noupe.com//uploads/2011/03/0352_500px.jpg[/img]
[hr]
9.創建一個可愛的向量馴鹿│ http://blog.spoongraphics.co.uk/tutorials/create-a-cute-vector-reindeer-character-in-illustrator
[img]http://www.blog.spoongraphics.co.uk/wp-content/uploads/2010/reindeer/reindeer-character-sm.jpg[/img]
[hr]
10.以Illustrator創造一個向量的優雅貓頭鷹圖案│http://blog.spoongraphics.co.uk/tutorials/create-an-elegant-patterned-vector-owl-in-illustrator
[img]http://www.blog.spoongraphics.co.uk/wp-content/uploads/2010/illustrated-owl/vector-owl-sm.jpg[/img]
[hr]
11.創建一個簡單的技工│http://blog.spoongraphics.co.uk/tutorials/create-a-simple-mechanic-character-in-illustrator
適合初學者的向量角色繪製
[img]http://www.blog.spoongraphics.co.uk/wp-content/uploads/2010/mechanic-character/mechanic-character-sm.png[/img]
[hr]
12.可愛老虎繪製│http://designinformer.smashingmagazine.com/2010/01/20/create-a-cute-little-tiger-in-illustrator/
[img]http://api.photoshop.com/v1.0/accounts/ce623456af6a4e469a7d88bc2b85162c/assets/15f1bb7b69da400b9d214fa59a59d0c9[/img]
Changed By: JinJin
Change Date: March 14, 2012 11:31PM
[講義] Illustrator 角色繪製
Change Date: March 14, 2012 11:31PM
[講義] Illustrator 角色繪製
<h2>Illustrator角色建立示範</h2>
1.設計簡潔的向量熊<h3│
>設計簡潔的向量熊貓角色</h3>
http://blog.spoongraphics.co.uk/tutorials/create-a-cool-vector-panda-character-in-illustrator
原創來自克里斯斯普納的的教程。
利用幾個簡單的圖形、善用顏色漸層級漸變工具、以及善用陰影,不用出現外框,就可以創造出簡潔生動的角色。
這個練習雖然看似簡單,但每位同學都要練習,學習以漸層與陰影取代外框,製作高質感的簡易插畫。
[img]http://www.blog.spoongraphics.co.uk/wp-content/uploads/2010/panda/01.jpg[/img]
[img]http://www.blog.spoongraphics.co.uk/wp-content/uploads/2010/panda/vector-panda-character.jpg[/img]
[hr]
1.使用橢圓工具,搭配Shift鍵,畫出一正圓
[IMG]http://i556.photobucket.com/albums/ss1/whc915/panda001.jpg[/IMG]
[hr]
2.使用直接選取工具,點選最上端的空心點,向下垂直拖曳
[IMG]http://i556.photobucket.com/albums/ss1/whc915/panda002.jpg[/IMG]
[hr]
3.再繪製另一個較小的圓,以類似的做法完成鼻子的輪廓
[IMG]http://i556.photobucket.com/albums/ss1/whc915/panda003.jpg[/IMG]
[IMG]http://i556.photobucket.com/albums/ss1/whc915/panda004.jpg[/IMG]
[hr]
4.接著同樣以橢圓工具搭配Shift鍵畫出一正圓,右側靠在鼻子的中心點上
[IMG]http://i556.photobucket.com/albums/ss1/whc915/panda005.jpg[/IMG]
將鼻子按右鍵→排列順序→置在最前
再將剛剛正圓按Alt鍵,對稱複製於右側
[IMG]http://i556.photobucket.com/albums/ss1/whc915/panda006.jpg[/IMG]
[hr]
5.接著同樣以橢圓工具搭配Shift鍵畫出一正圓,繪製大大的眼睛
[IMG]http://i556.photobucket.com/albums/ss1/whc915/panda007.jpg[/IMG]
[hr]
6.選取大圓眼,物件→變形→縮放→70%→拷貝
[IMG]http://i556.photobucket.com/albums/ss1/whc915/panda008.jpg[/IMG]
[hr]
7.再複製65%,將此圓,移動,接著繪製更小的圓,製作眼球中的亮點
[IMG]http://i556.photobucket.com/albums/ss1/whc915/panda009.jpg[/IMG]
[hr]
8.選取整組眼睛,Shift+Alt→水平移動複製到右邊
[IMG]http://i556.photobucket.com/albums/ss1/whc915/panda011.jpg[/IMG]
[hr]
9.接著製作耳朵,一樣用橢圓工具製作
[IMG]http://i556.photobucket.com/albums/ss1/whc915/panda012.jpg[/IMG]
[IMG]http://i556.photobucket.com/albums/ss1/whc915/panda013.jpg[/IMG]
[IMG]http://i556.photobucket.com/albums/ss1/whc915/panda014.jpg[/IMG]
[hr]
10.接著製作身體
[IMG]http://i556.photobucket.com/albums/ss1/whc915/panda015.jpg[/IMG]
[IMG]http://i556.photobucket.com/albums/ss1/whc915/panda016.jpg[/IMG]
[IMG]http://i556.photobucket.com/albums/ss1/whc915/panda017.jpg[/IMG]
[IMG]http://i556.photobucket.com/albums/ss1/whc915/panda018.jpg[/IMG]
[IMG]http://i556.photobucket.com/albums/ss1/whc915/panda019.jpg[/IMG]
[IMG]http://i556.photobucket.com/albums/ss1/whc915/panda020.jpg[/IMG]
[IMG]http://i556.photobucket.com/albums/ss1/whc915/panda021.jpg[/IMG]
[IMG]http://i556.photobucket.com/albums/ss1/whc915/panda022.jpg[/IMG]
[hr]
11.黑框線稿完成
[IMG]http://i556.photobucket.com/albums/ss1/whc915/panda023.jpg[/IMG]
[hr]
上色時,善用漸層工具,將可輕鬆取代外框線稿,並產生豐富生動的效果
[IMG]http://i556.photobucket.com/albums/ss1/whc915/panda024.jpg[/IMG]
[IMG]http://i556.photobucket.com/albums/ss1/whc915/panda026.jpg[/IMG]
[IMG]http://i556.photobucket.com/albums/ss1/whc915/panda027.jpg[/IMG]
[hr]
製作眼睛外框的陰影,效果→風格化→製作陰影
[IMG]http://i556.photobucket.com/albums/ss1/whc915/panda029.jpg[/IMG]
[hr]
頭部及手部的陰影,則可多繪製一個區塊,選擇→效果→模糊→高斯模糊
[IMG]http://i556.photobucket.com/albums/ss1/whc915/panda030.jpg[/IMG]
再加上透明度約15%左右,可適當調整至適中
[IMG]http://i556.p[IMG]http://i556.photobucket.com/albums/ss1/whc915/panda032.jpg[/IMG]
[IMG]http://i556.photobucket.com/albums/ss1/whc915/panda033.jpg[/IMG]
[IMG]http://i556.photobucket.com/albums/ss1/whc915/panda035.jpg[/IMG]
hotobucket.com/albums/ss1/whc915/panda031.jpg[/IMG]
[hr]
完成稿
[IMG]http://i556.photobucket.com/albums/ss1/whc915/panda032.jpg[/IMG]
[hr]
[color=#993300]※補充說明:[/color]
<b>[color=#009999]「漸層」工具[/color]</b>
「漸層」工具可提供與「漸層」面板大致相同的功能。可以使用漸層註解者修改線性漸層的角度、位置和擴散,或修改放射性漸層的焦點、原點和擴散。按兩下個別漸層色標可以指定新的色彩設定和不透明度設定,或將漸層色標拖移到新的位置。
將指標放在漸層上方並出現旋轉游標時,可以拖移來重新放置漸層角度。拖移漸層滑桿的圓形端點可重新放置漸層原點,而拖移箭頭端點可增加或減少漸層範圍。
[img]http://help.adobe.com/zh_TW/[hr]
<h2>其他網路教程參考範例</h2>
網路上有許多專業且多樣風格的角色繪製技巧,同學們可以選擇自己喜歡的風格或繪製方式,試著按照教程自己做看看吧,相信可以從中學習許多寶貴的繪製技巧與創意發想。
[hr]
1.人物角色繪製│http://colorburned.com/2009/07/create-a-character-mascot-with-adobe-illustrator-cs4.html
[img]http://api.photoshop.com/v1.0/accounts/ce623456af6a4e469a7d88bc2b85162c/assets/17c9ccc3b3144b8bb6216be7bc5f7625[/img]
[hr]
2.可愛和簡單的河馬│http://vforvectors.com/create-a-cute-and-simple-hippo-face/
簡單的Illustrator教程橢圓工具,矩形工具,圓角矩形工具創建簡單的河馬。
[img]http://vforvectors.com/wp-content/uploads/2010/02/00.jpg[/img]
[hr]
3.Twitter鳥LOGO│ http://bloomwebdesign.net/myblog/2011/08/11/create-a-cute-twitter-bird-character-in-illustrator/
了解如何以Illustrator繪製可愛的卡通Twitter鳥。
[img]http://bloomwebdesign.net/myblog/files/2011/08/twitter-character-bird-icon-vector-illustrator-tweet.jpg[/img]
[hr]
4.向量士兵製作│ http://blog.spoongraphics.co.uk/tutorials/how-to-create-a-vector-soldier-character-in-illustrator
下面的教程教你如何以 Illustrator 創建可愛的向量士兵。
[img]http://www.blog.spoongraphics.co.uk/wp-content/uploads/2011/soldier-character/vector-soldier-character.jpg[/img]
e=1038,filename=panda--_.ai]Panda線搞[img]http://www.blog.spoongraphics.co.uk/wp-content/uploads/2010/illustrated-owl/vector-owl-sm.jpg[/img]
com/albums/ss1/whc915/ma047.jpg />
<img width=50% src=http://i556.photobucket.com/albums/ss1/whc915/ma048.jpg />
<img width=50% src=http://i556.photobucket.com/albums/ss1/whc915/ma049.jpg />
<img width=50% src=http://i556.photobucket.com/albums/ss1/whc915/ma050.jpg />
<img width=50% src=http://i556.photobucket.com/albums/ss1/whc915/ma051.jpg />
<img width=50% src=http://i556.photobucket.com/albums/ss1/whc915/ma052.jpg />
<img width=50% src=http://i556.photobucket.com/albums/ss1/whc915/ma053.jpg />
<img width=50% src=http://i556.photobucket.com/albums/ss1/whc915/ma054.jpg />
<img width=50% src=http://i556.photobucket.com/albums/ss1/whc915/ma055.jpg />
<img width=50% src=http://i556.photobucket.com/albums/ss1/whc915/ma056.jpg />
<img width=50% src=http://i556.photobucket.com/albums/ss1/whc915/ma057.jpg />
<img width=50% src=http://i556.photobucket.com/albums/ss1/whc915/ma058.jpg />
<img width=50% src=http://i556.photobucket.com/albums/ss1/whc915/ma059.jpg />
[hr]
置入photoshop
<img width=50% src=http://i556.photobucket.com/albums/ss1/whc915/ma064.jpg />
<img width=50% src=http://i556.photobucket.com/albums/ss1/whc915/ma065.jpg />
<img width=50% src=http://i556.photobucket.com/albums/ss1/whc915/ma066.jpg />
<img width=50% src=http://i556.photobucket.com/albums/ss1/whc915/ma067.jpg />
[hr]
完成品
<img width=50% src=http://i556.photobucket.com/albums/ss1/whc915/ma068.jpg />
[hr]
<h2>其他網路教程參考範例</h2>
網路上有許多專業且多樣風格的角色繪製技巧,同學們可以選擇自己喜歡的風格或繪製方式,試著按照教程自己做看看吧,相信可以從中學習許多寶貴的繪製技巧與創意發想。
[hr]
1.人物角色繪製│http://colorburned.com/2009/07/create-a-character-mascot-with-adobe-illustrator-cs4.html
[img]http://api.photoshop.com/v1.0/accounts/ce623456af6a4e469a7d88bc2b85162c/assets/17c9ccc3b3144b8bb6216be7bc5f7625[/img]
[hr]
2.可愛和簡單的河馬│http://vforvectors.com/create-a-cute-and-simple-hippo-face/
簡單的Illustrator教程橢圓工具,矩形工具,圓角矩形工具創建簡單的河馬。
[img]http://vforvectors.com/wp-content/uploads/2010/02/00.jpg[/img]
[hr]
3.Twitter鳥LOGO│ http://bloomwebdesign.net/myblog/2011/08/11/create-a-cute-twitter-bird-character-in-illustrator/
了解如何以Illustrator繪製可愛的卡通Twitter鳥。
[img]http://bloomwebdesign.net/myblog/files/2011/08/twitter-character-bird-icon-vector-illustrator-tweet.jpg[/img]
[hr]
4.向量士兵製作│ http://blog.spoongraphics.co.uk/tutorials/how-to-create-a-vector-soldier-character-in-illustrator
下面的教程教你如何以 Illustrator 創建可愛的向量士兵。
[img]http://www.blog.spoongraphics.co.uk/wp-content/uploads/2011/soldier-character/vector-soldier-character.jpg[/img]
[hr]
5.使用Illustrator創建一個條紋的貓│ http://www.cutelittlefactory.com/tutorials/create-a-tiger-striped-cat-with-illustrator/
[img]http://www.cutelittlefactory.com/wp-content/uploads/2010/07/final.jpg[/img]
[hr]
6.在Illustrator中創建的│ http://blog.spoongraphics.co.uk/tutorials/create-a-cool-vector-robot-character-in-illustrator
想學習Adobe Illustrator中的基本的向量機器人嗎?在本教程中,您將使用各種工具和技術來創建一個簡單的向量機器人。這個機器人使用大量的基本形狀,適合初學者掌握與Illustrator的應用程序。
[img]http://www.blog.spoongraphics.co.uk/wp-content/uploads/2011/robot/robot-character-sm.jpg[/img]
[hr]
7.頭巾娃娃│http://bloomwebdesign.net/myblog/2011/04/14/design-a-babushka-doll-in-illustrator/
如何在Illustrator中,建立東歐模式的頭巾娃娃。
[img]http://bloomwebdesign.net/myblog/files/2011/04/babushka-doll-design-vector.jpg[/img]
[hr]
8.可愛的小豬撲滿│http://www.noupe.com/tutorial/how-to-create-a-cute-piggy-bank-in-perspective-with-adobe-illustrator.html
創建一個可愛的粉紅色的小豬撲滿。
[img]http://media.noupe.com//uploads/2011/03/0352_500px.jpg[/img]
[hr]
9.創建一個可愛的向量馴鹿│ http://blog.spoongraphics.co.uk/tutorials/create-a-cute-vector-reindeer-character-in-illustrator
[img]http://www.blog.spoongraphics.co.uk/wp-content/uploads/2010/reindeer/reindeer-character-sm.jpg[/img]
[hr]
10.以Illustrator創造一個向量的優雅貓頭鷹圖案│http://blog.spoongraphics.co.uk/tutorials/create-an-elegant-patterned-vector-owl-in-illustrator
[img]http://www.blog.spoongraphics.co.uk/wp-content/uploads/2010/illustrated-owl/vector-owl-sm.jpg[/img]
[hr]
11.創建一個簡單的技工│http://blog.spoongraphics.co.uk/tutorials/create-a-simple-mechanic-character-in-illustrator
適合初學者的向量角色繪製
[img]http://www.blog.spoongraphics.co.uk/wp-content/uploads/2010/mechanic-character/mechanic-character-sm.png[/img]
[hr]
12.可愛老虎繪製│http://designinformer.smashingmagazine.com/2010/01/20/create-a-cute-little-tiger-in-illustrator/
[img]http://api.photoshop.com/v1.0/accounts/ce623456af6a4e469a7d88bc2b85162c/assets/15f1bb7b69da400b9d214fa59a59d0c9[/img]
Changed By: JinJin
Change Date: March 14, 2012 11:30PM
[講義] Illustrator 角色繪製
Change Date: March 14, 2012 11:30PM
[講義] Illustrator 角色繪製
Changed By: JinJin
Change Date: March 14, 2012 11:08PM
[講義] Illustrator 角色繪製
Change Date: March 14, 2012 11:08PM
[講義] Illustrator 角色繪製
Changed By: JinJin
Change Date: March 14, 2012 11:08PM
[講義] Illustrator 角色繪製
Change Date: March 14, 2012 11:08PM
[講義] Illustrator 角色繪製
Original Message
作者: JinJinDate: March 14, 2012 04:22PM
[講義] Illustrator 角色繪製
Illustrator角色建立示範
1.設計簡潔的向量熊
http://blog.spoongraphics.co.uk/tutorials/create-a-cool-vector-panda-character-in-illustrator
原創來自克里斯斯普納的的教程。
利用幾個簡單的圖形、善用顏色漸層級漸變工具、以及善用陰影,不用出現外框,就可以創造出簡潔生動的角色。
這個練習雖然看似簡單,但每位同學都要練習,學習以漸層與陰影取代外框,製作高質感的簡易插畫。
[img]http://www.blog.spoongraphics.co.uk/wp-content/uploads/2010/panda/01.jpg[/img]
[img]http://www.blog.spoongraphics.co.uk/wp-content/uploads/2010/panda/vector-panda-character.jpg[/img]
[hr]
1.使用橢圓工具,搭配Shift鍵,畫出一正圓
[IMG]http://i556.photobucket.com/albums/ss1/whc915/panda001.jpg[/IMG]
[hr]
2.使用直接選取工具,點選最上端的空心點,向下垂直拖曳
[IMG]http://i556.photobucket.com/albums/ss1/whc915/panda002.jpg[/IMG]
[hr]
3.再繪製另一個較小的圓,以類似的做法完成鼻子的輪廓
[IMG]http://i556.photobucket.com/albums/ss1/whc915/panda003.jpg[/IMG]
[IMG]http://i556.photobucket.com/albums/ss1/whc915/panda004.jpg[/IMG]
[hr]
4.接著同樣以橢圓工具搭配Shift鍵畫出一正圓,右側靠在鼻子的中心點上
[IMG]http://i556.photobucket.com/albums/ss1/whc915/panda005.jpg[/IMG]
將鼻子按右鍵→排列順序→置在最前
再將剛剛正圓按Alt鍵,對稱複製於右側
[IMG]http://i556.photobucket.com/albums/ss1/whc915/panda006.jpg[/IMG]
[hr]
5.接著同樣以橢圓工具搭配Shift鍵畫出一正圓,繪製大大的眼睛
[IMG]http://i556.photobucket.com/albums/ss1/whc915/panda007.jpg[/IMG]
[hr]
6.選取大圓眼,物件→變形→縮放→70%→拷貝
[IMG]http://i556.photobucket.com/albums/ss1/whc915/panda008.jpg[/IMG]
[hr]
7.再複製65%,將此圓,移動,接著繪製更小的圓,製作眼球中的亮點
[IMG]http://i556.photobucket.com/albums/ss1/whc915/panda009.jpg[/IMG]
[hr]
8.選取整組眼睛,Shift+Alt→水平移動複製到右邊
[IMG]http://i556.photobucket.com/albums/ss1/whc915/panda011.jpg[/IMG]
[hr]
9.接著製作耳朵,一樣用橢圓工具製作
[IMG]http://i556.photobucket.com/albums/ss1/whc915/panda012.jpg[/IMG]
[IMG]http://i556.photobucket.com/albums/ss1/whc915/panda013.jpg[/IMG]
[IMG]http://i556.photobucket.com/albums/ss1/whc915/panda014.jpg[/IMG]
[hr]
10.接著製作身體
[IMG]http://i556.photobucket.com/albums/ss1/whc915/panda015.jpg[/IMG]
[IMG]http://i556.photobucket.com/albums/ss1/whc915/panda016.jpg[/IMG]
[IMG]http://i556.photobucket.com/albums/ss1/whc915/panda017.jpg[/IMG]
[IMG]http://i556.photobucket.com/albums/ss1/whc915/panda018.jpg[/IMG]
[IMG]http://i556.photobucket.com/albums/ss1/whc915/panda019.jpg[/IMG]
[IMG]http://i556.photobucket.com/albums/ss1/whc915/panda020.jpg[/IMG]
[IMG]http://i556.photobucket.com/albums/ss1/whc915/panda021.jpg[/IMG]
[IMG]http://i556.photobucket.com/albums/ss1/whc915/panda022.jpg[/IMG]
[hr]
11.黑框線稿完成
[IMG]http://i5[IMG]http://i556.photobucket.com/albums/ss1/whc915/panda024.jpg[/IMG]
[hr]
上色時,善用漸層工具,將可輕鬆取代外框線稿,並產生豐富生動的效果
[IMG]http://i556.photobucket.com/albums/ss1/whc915/panda026.jpg[/IMG]
[IMG]http://i556.photobucket.com/albums/ss1/whc915/panda027.jpg[/IMG]
完成稿
[IMG]http://i556.photobucket.com/albums/ss1/whc915/panda028.jpg[/IMG]
[hr]
製作眼睛外框的陰影,效果→風格化→製作陰影
[IMG]http://i556.photobucket.com/albums/ss1/whc915/panda029.jpg[/IMG]
[hr]
頭部及手部的陰影,則可多繪製一個區塊,選擇→效果→模糊→高斯模糊
[IMG]http://i556.photobucket.com/albums/ss1/whc915/panda030.jpg[/IMG]
再加上透明度約15%左右,可適當調整至適中
[IMG]http://i556.photobucket.com/albums/ss1/whc915/panda027.jpg[/IMG]
[IMG]http://i556.photobucket.com/albums/ss1/whc915/panda031.jpg[/IMG]
[hr]
完成稿
[IMG]http://i556.photobucket.com/albums/ss1/whc915/panda032.jpg[/IMG]
�明度約15%左右,可適當調整至適中
[IMG]http://i556.p[IMG]http://i556.photobucket.com/albums/ss1/whc915/panda032.jpg[/IMG]
[IMG]http://i556.photobucket.com/albums/ss1/whc915/panda033.jpg[/IMG]
[IMG]http://i556.photobucket.com/albums/ss1/whc915/panda035.jpg[/IMG]
hotobucket.com/albums/ss1/whc915/panda031.jpg[/IMG]
[hr]
完成稿
[IMG]http://i556.photobucket.com/albums/ss1/whc915/panda032.jpg[/IMG]
[hr]
[color=#993300]※補充說明:[/color]
[color=#009999]「漸層」工具[/color]
「漸層」工具可提供與「漸層」面板大致相同的功能。可以使用漸層註解者修改線性漸層的角度、位置和擴散,或修改放射性漸層的焦點、原點和擴散。按兩下個別漸層色標可以指定新的色彩設定和不透明度設定,或將漸層色標拖移到新的位置。
將指標放在漸層上方並出現旋轉游標時,可以拖移來重新放置漸層角度。拖移漸層滑桿的圓形端點可重新放置漸層原點,而拖移箭頭端點可增加或減少漸層範圍。
[img]http://help.adobe.com/zh_TW/[hr]
其他網路教程參考範例
網路上有許多專業且多樣風格的角色繪製技巧,同學們可以選擇自己喜歡的風格或繪製方式,試著按照教程自己做看看吧,相信可以從中學習許多寶貴的繪製技巧與創意發想。
[hr]
1.人物角色繪製│http://colorburned.com/2009/07/create-a-character-mascot-with-adobe-illustrator-cs4.html
[img]http://api.photoshop.com/v1.0/accounts/ce623456af6a4e469a7d88bc2b85162c/assets/17c9ccc3b3144b8bb6216be7bc5f7625[/img]
[hr]
2.可愛和簡單的河馬│http://vforvectors.com/create-a-cute-and-simple-hippo-face/
簡單的Illustrator教程橢圓工具,矩形工具,圓角矩形工具創建簡單的河馬。
[img]http://vforvectors.com/wp-content/uploads/2010/02/00.jpg[/img]
[hr]
3.Twitter鳥LOGO│ http://bloomwebdesign.net/myblog/2011/08/11/create-a-cute-twitter-bird-character-in-illustrator/
了解如何以Illustrator繪製可愛的卡通Twitter鳥。
[img]http://bloomwebdesign.net/myblog/files/2011/08/twitter-character-bird-icon-vector-illustrator-tweet.jpg[/img]
[hr]
4.向量士兵製作│ http://blog.spoongraphics.co.uk/tutorials/how-to-create-a-vector-soldier-character-in-illustrator
下面的教程教你如何以 Illustrator 創建可愛的向量士兵。
[img]http://www.blog.spoongraphics.co.uk/wp-content/uploads/2011/soldier-character/vector-soldier-character.jpg[/img]
e=1038,filename=panda--_.ai]Panda線搞[img]http://www.blog.spoongraphics.co.uk/wp-content/uploads/2010/illustrated-owl/vector-owl-sm.jpg[/img]
com/albums/ss1/whc915/ma047.jpg />
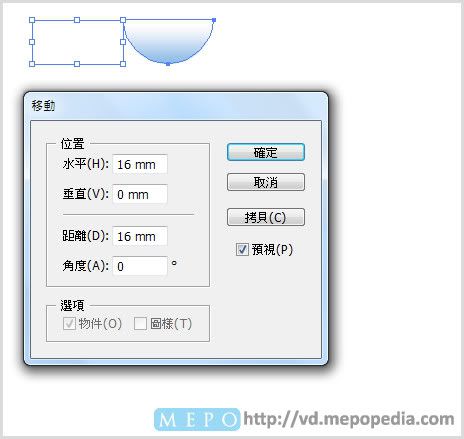
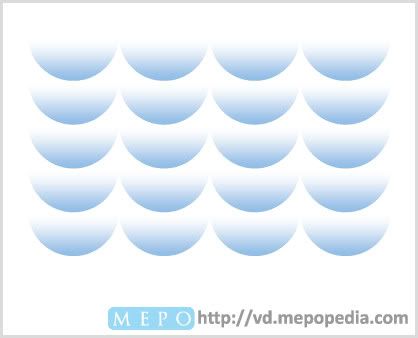
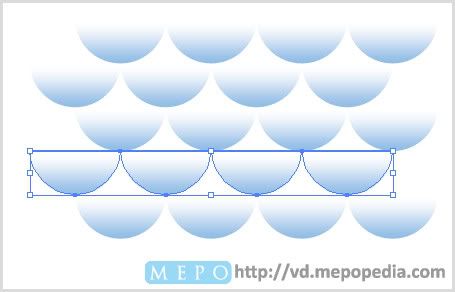

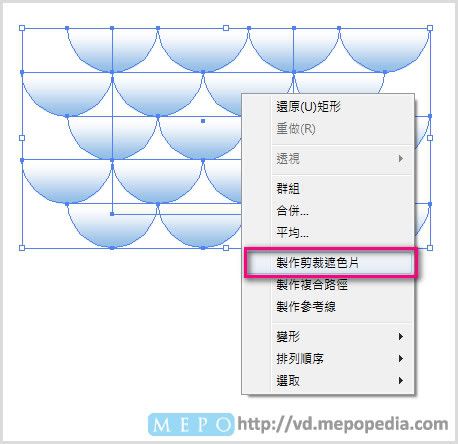
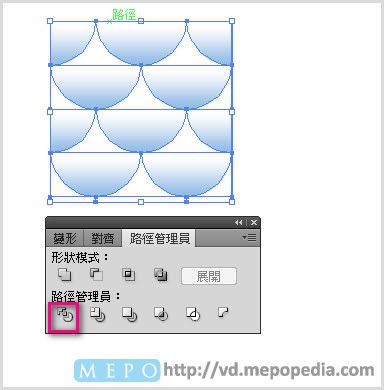
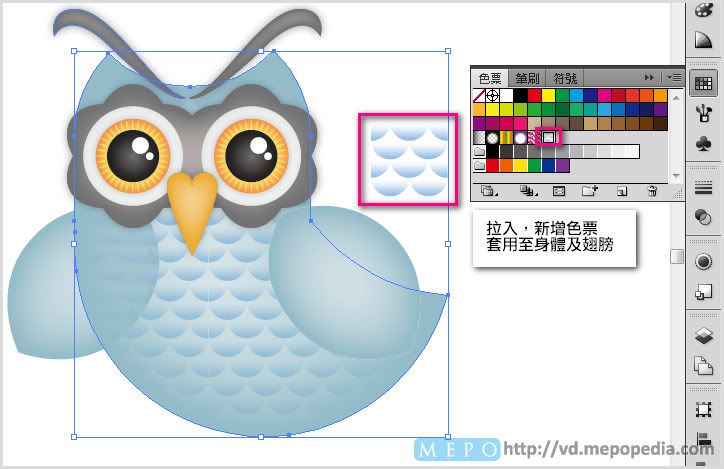
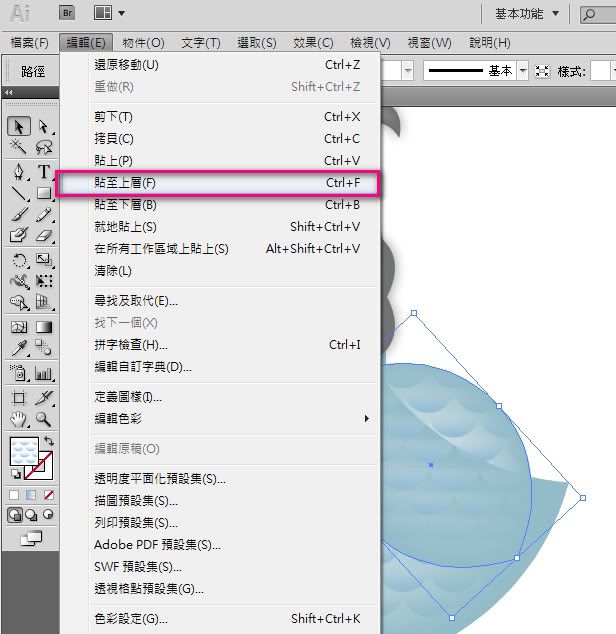
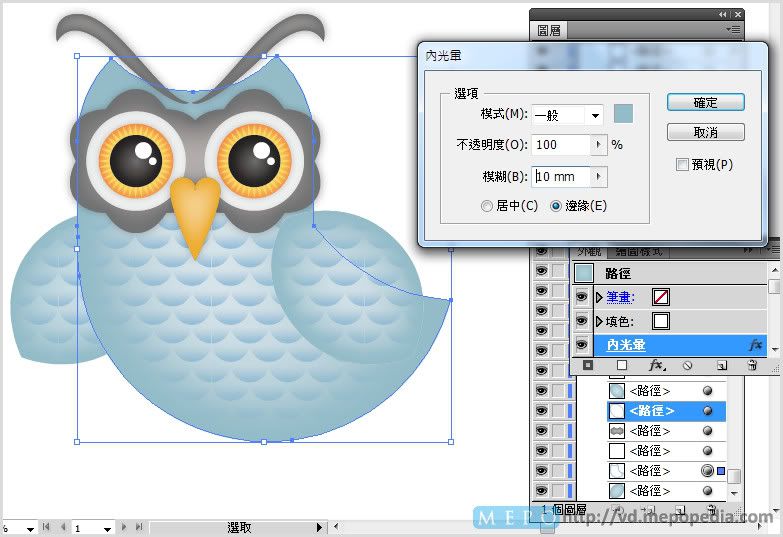
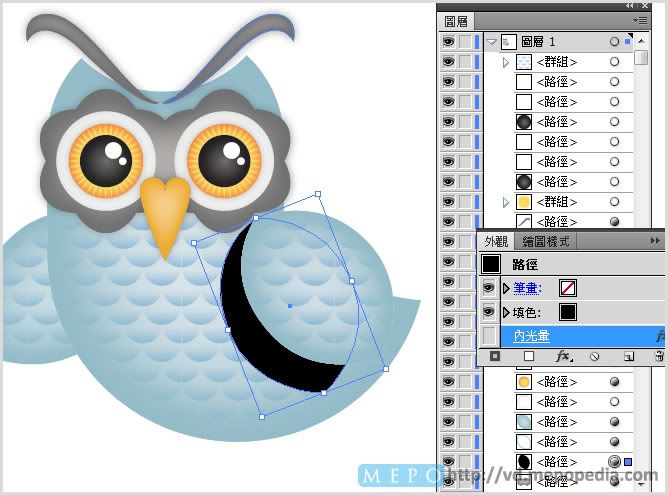
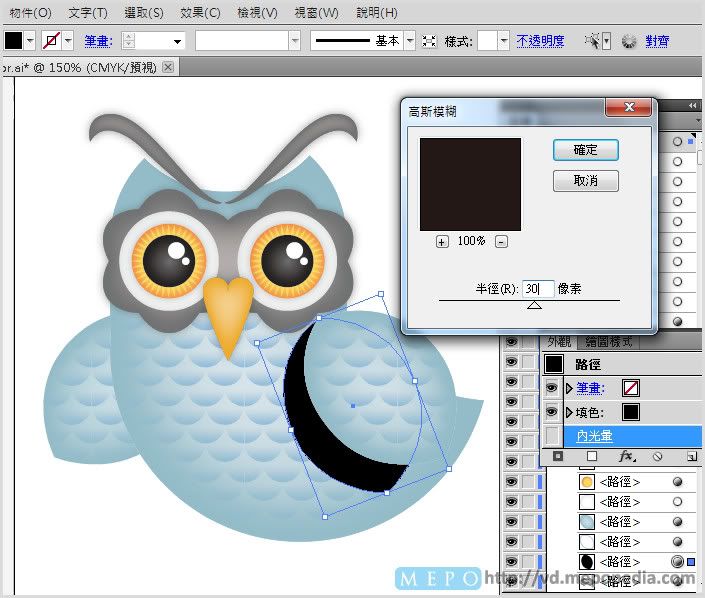
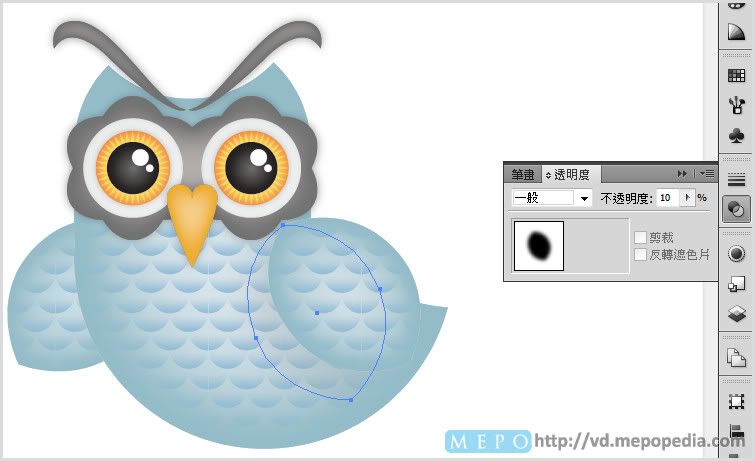
[hr]
置入photoshop
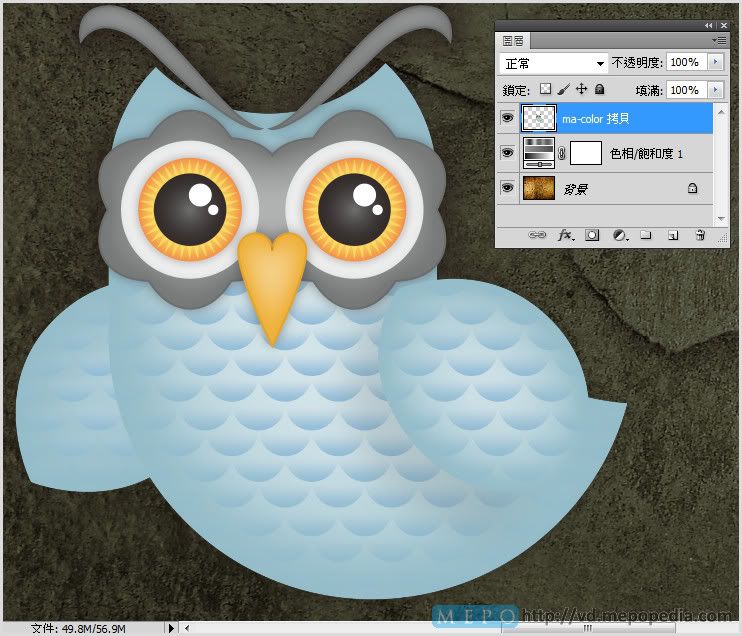
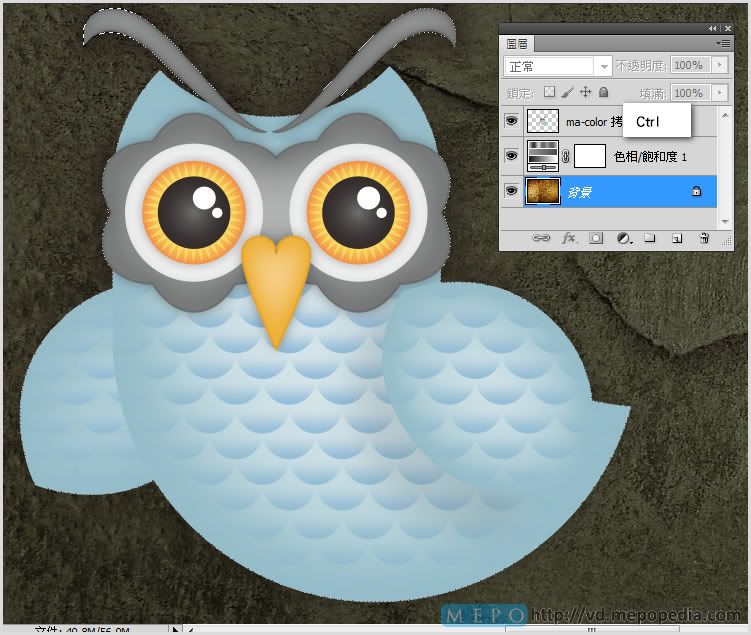
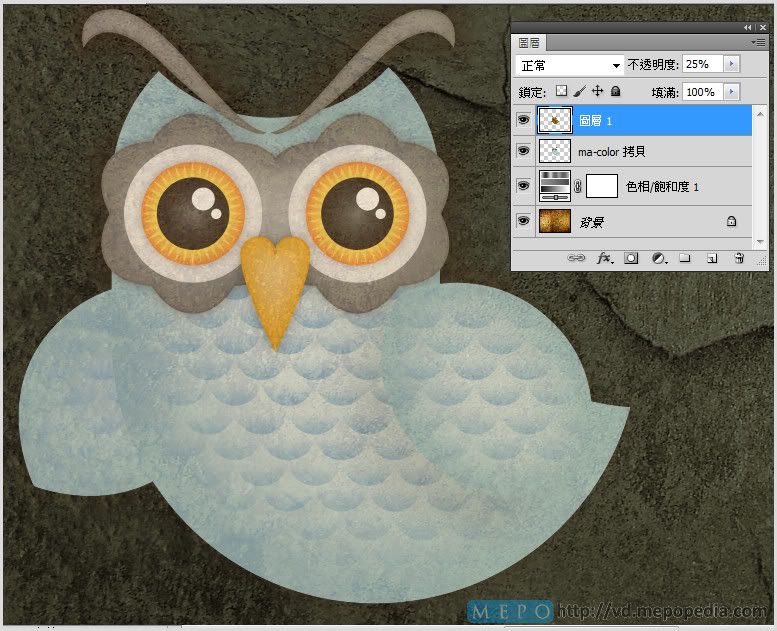
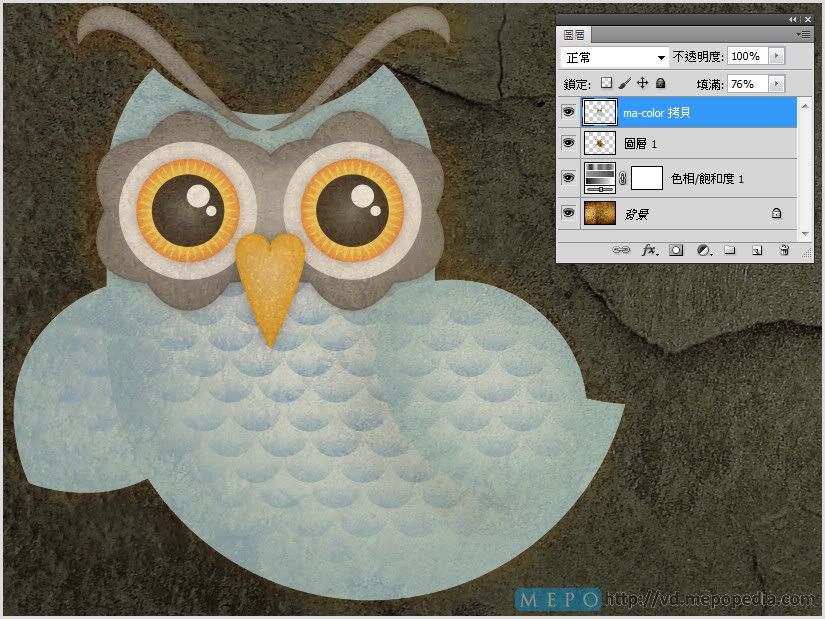
[hr]
完成品
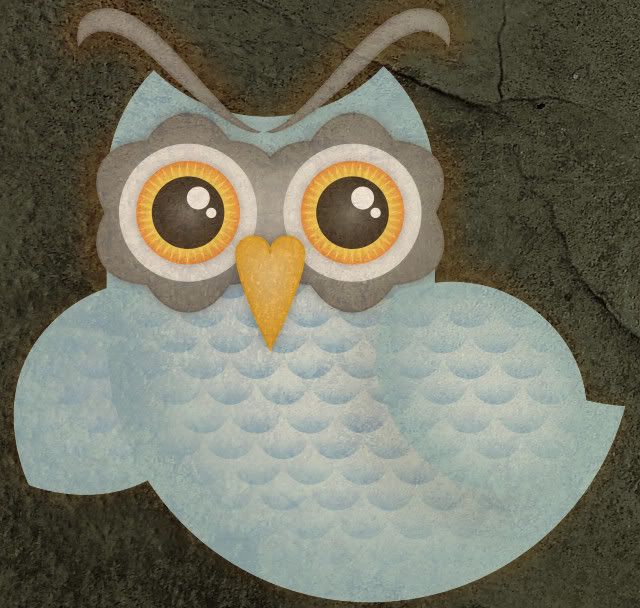
[hr]
其他網路教程參考範例
網路上有許多專業且多樣風格的角色繪製技巧,同學們可以選擇自己喜歡的風格或繪製方式,試著按照教程自己做看看吧,相信可以從中學習許多寶貴的繪製技巧與創意發想。
[hr]
1.人物角色繪製│http://colorburned.com/2009/07/create-a-character-mascot-with-adobe-illustrator-cs4.html
[img]http://api.photoshop.com/v1.0/accounts/ce623456af6a4e469a7d88bc2b85162c/assets/17c9ccc3b3144b8bb6216be7bc5f7625[/img]
[hr]
2.可愛和簡單的河馬│http://vforvectors.com/create-a-cute-and-simple-hippo-face/
簡單的Illustrator教程橢圓工具,矩形工具,圓角矩形工具創建簡單的河馬。
[img]http://vforvectors.com/wp-content/uploads/2010/02/00.jpg[/img]
[hr]
3.Twitter鳥LOGO│ http://bloomwebdesign.net/myblog/2011/08/11/create-a-cute-twitter-bird-character-in-illustrator/
了解如何以Illustrator繪製可愛的卡通Twitter鳥。
[img]http://bloomwebdesign.net/myblog/files/2011/08/twitter-character-bird-icon-vector-illustrator-tweet.jpg[/img]
[hr]
4.向量士兵製作│ http://blog.spoongraphics.co.uk/tutorials/how-to-create-a-vector-soldier-character-in-illustrator
下面的教程教你如何以 Illustrator 創建可愛的向量士兵。
[img]http://www.blog.spoongraphics.co.uk/wp-content/uploads/2011/soldier-character/vector-soldier-character.jpg[/img]
[hr]
5.使用Illustrator創建一個條紋的貓│ http://www.cutelittlefactory.com/tutorials/create-a-tiger-striped-cat-with-illustrator/
[img]http://www.cutelittlefactory.com/wp-content/uploads/2010/07/final.jpg[/img]
[hr]
6.在Illustrator中創建的│ http://blog.spoongraphics.co.uk/tutorials/create-a-cool-vector-robot-character-in-illustrator
想學習Adobe Illustrator中的基本的向量機器人嗎?在本教程中,您將使用各種工具和技術來創建一個簡單的向量機器人。這個機器人使用大量的基本形狀,適合初學者掌握與Illustrator的應用程序。
[img]http://www.blog.spoongraphics.co.uk/wp-content/uploads/2011/robot/robot-character-sm.jpg[/img]
[hr]
7.頭巾娃娃│http://bloomwebdesign.net/myblog/2011/04/14/design-a-babushka-doll-in-illustrator/
如何在Illustrator中,建立東歐模式的頭巾娃娃。
[img]http://bloomwebdesign.net/myblog/files/2011/04/babushka-doll-design-vector.jpg[/img]
[hr]
8.可愛的小豬撲滿│http://www.noupe.com/tutorial/how-to-create-a-cute-piggy-bank-in-perspective-with-adobe-illustrator.html
創建一個可愛的粉紅色的小豬撲滿。
[img]http://media.noupe.com//uploads/2011/03/0352_500px.jpg[/img]
[hr]
9.創建一個可愛的向量馴鹿│ http://blog.spoongraphics.co.uk/tutorials/create-a-cute-vector-reindeer-character-in-illustrator
[img]http://www.blog.spoongraphics.co.uk/wp-content/uploads/2010/reindeer/reindeer-character-sm.jpg[/img]
[hr]
10.以Illustrator創造一個向量的優雅貓頭鷹圖案│http://blog.spoongraphics.co.uk/tutorials/create-an-elegant-patterned-vector-owl-in-illustrator
[img]http://www.blog.spoongraphics.co.uk/wp-content/uploads/2010/illustrated-owl/vector-owl-sm.jpg[/img]
[hr]
11.創建一個簡單的技工│http://blog.spoongraphics.co.uk/tutorials/create-a-simple-mechanic-character-in-illustrator
適合初學者的向量角色繪製
[img]http://www.blog.spoongraphics.co.uk/wp-content/uploads/2010/mechanic-character/mechanic-character-sm.png[/img]
[hr]
12.可愛老虎繪製│http://designinformer.smashingmagazine.com/2010/01/20/create-a-cute-little-tiger-in-illustrator/
[img]http://api.photoshop.com/v1.0/accounts/ce623456af6a4e469a7d88bc2b85162c/assets/15f1bb7b69da400b9d214fa59a59d0c9[/img]
MEPO forum
is powered by Phorum.